Electrolux EW27MC65JW Complete Owner's Guide (English) - Page 19
Lower oven racks
 |
View all Electrolux EW27MC65JW manuals
Add to My Manuals
Save this manual to your list of manuals |
Page 19 highlights
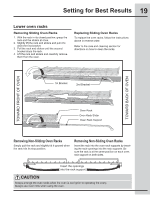
Setting for Best Results 19 Lower oven racks Removing Sliding Oven Racks 1. With the rack in its closed position; grasp the rack and the sliders at once. 2. Slightly lift the rack and sliders and pull it to clear the first bracket. 3. Pull the rack and sliders until the second bracket stops the rack. 4. Lift the rack and sliders and carefully remove them from the oven. Replacing Sliding Oven Racks To replace the oven racks, follow the instructions above in reverse order. Refer to the care and cleaning section for directions on how to clean the racks. TOWARD FRONT OF OVEN TOWARD back OF OVEN 1st Bracket 2nd Bracket Oven Rack Oven Rack Slider Oven Rack Support Removing Non-Sliding Oven Racks Simply pull the rack and slightly tilt it upward when the rack hits its stop position. Removing Non-Sliding Oven Racks Insert the rack into the oven rack supports by inserting the rack openings into the rack supports. Be sure the rack is at the same position on each oven rack support on both sides. Insert the openings into the rack support Always arrange the oven racks when the oven is cool (prior to operating the oven). Always use oven mitts when using the oven.
-
 1
1 -
2
-
3
-
4
-
5
-
6
-
7
-
8
-
9
-
10
-
11
-
12
-
13
-
 14
14 -
 15
15 -
 16
16 -
 17
17 -
 18
18 -
 19
19 -
 20
20 -
 21
21 -
 22
22 -
 23
23 -
 24
24 -
25
-
26
-
27
-
28
-
29
-
30
-
31
-
32
-
33
-
34
-
35
-
36
-
37
-
38
-
39
-
40
-
41
-
42
-
43
-
44
-
45
-
46
-
47
-
48
-
49
-
50
-
51
-
52
-
53
-
54
-
55
-
56
-
57
-
58
-
59
-
60
-
61
-
62
-
63
-
64
-
65
-
66
-
67
-
68
-
69
-
70
-
71
-
72
 |
 |
