Epson 1640XL Product Information Guide - Page 7
Starting EPSON TWAIN Pro Network, Starting a Scan, Stopping a Scan in Progress - driver
 |
UPC - 010343833548
View all Epson 1640XL manuals
Add to My Manuals
Save this manual to your list of manuals |
Page 7 highlights
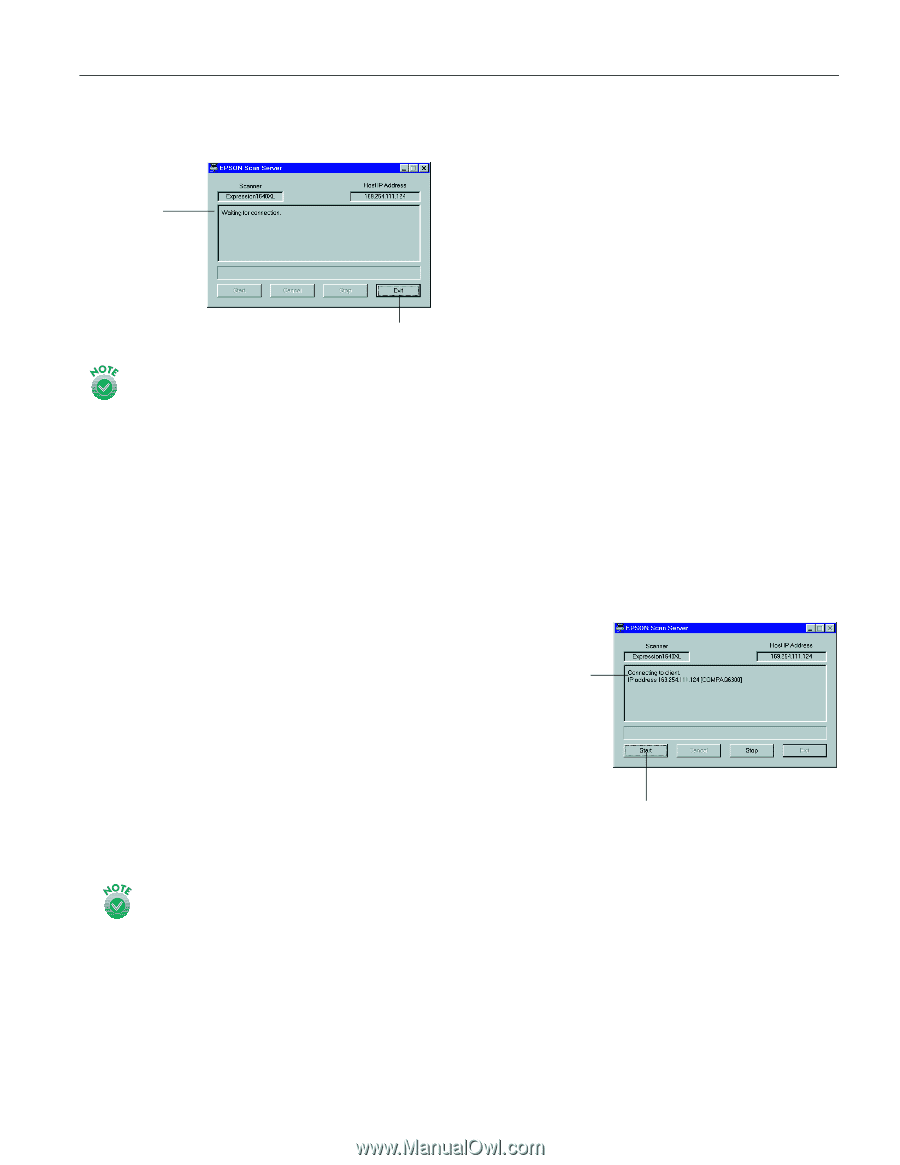
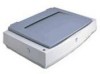
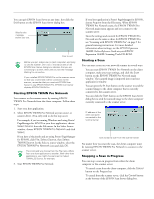
EPSON Expression 1640XL You can quit EPSON Scan Server at any time. Just click the Exit button on the EPSON Scan Server dialog box. Wait for this message before you exit. Click to exit Before you quit, make sure no client computers are trying to use the scanner. Don't exit if the status area of the EPSON Scan Server dialog box indicates that you are connecting to a client. Wait until you see the message Waiting for connection. If you installed EPSON TWAIN Pro on the scanner server so that you could make a direct connection to the scanner, remember that you must exit EPSON Scan Server to use EPSON TWAIN Pro. EPSON Scan Server disables EPSON TWAIN Pro. Starting EPSON TWAIN Pro Network You connect to the scanner server by starting EPSON TWAIN Pro Network from the client computer. Follow these steps: 1. Start your host application. 2. Select EPSON TWAIN Pro Network as your source, or scanner driver. (You only need to do this step once.) For example, if you're running Windows and using Presto! PageManager for EPSON as your host application, choose Select Source from the File menu. In the Select Source window, choose EPSON TWAIN Pro Network and click Select. If you have a Macintosh and are using Presto! PageManager for EPSON, click File, Select Source, then Select TWAIN Source. In the Select a source window, select the EPSON TWAIN Pro Network icon and click OK. The command you choose from the File menu differs from one host application to another. With other host applications, you might choose Import or Select TWAIN_32 Source, for example. 3. Start EPSON TWAIN Pro Network. If your host application is Presto! PageManager for EPSON, choose Acquire from the File menu. When EPSON TWAIN Pro Network starts, the EPSON TWAIN Pro Network main menu appears and you connect to the scanner server. Since the settings and controls for EPSON TWAIN Pro Network are the same as those for EPSON TWAIN Pro, see "Scanning with EPSON TWAIN Pro" on page 5 for general scanning instructions. For more detailed information about settings, see the EPSON Expression 1640XL Online Reference Guide on your EPSON Expression 1640XL Scanning Tools CD-ROM. Starting a Scan You can start a scan on your network scanner in several ways: t You can start EPSON TWAIN Pro Network on the client computer, make your scan settings, and click the Scan button on the EPSON TWAIN Pro Network main window. The scanned image is imported into your host application's window. t You can press the ] Start button on the scanner to send the scanned image to the client computer that is currently connected to the scanner server. t You can click the Start button on the EPSON Scan Server dialog box to send the scanned image to the client computer currently connected to the scanner server. IP address of the client computer connected to the scanner server Click to start a scan from the scanner server No matter how you start the scan, the client computer must be running EPSON TWAIN Pro Network to connect to the scanner server. Stopping a Scan in Progress You can stop a scan in progress from either the client computer or the scanner server. t To cancel a scan from the client computer, click the Cancel button on the Progress bar. t To cancel from the scanner server, click the Cancel button at the bottom of the EPSON Scan Server dialog box. 8/00 EPSON Expression 1640XL - 7
-
 1
1 -
 2
2 -
 3
3 -
 4
4 -
 5
5 -
 6
6 -
 7
7 -
 8
8
 |
 |