Epson 2000P Product Information Guide - Page 9
Cleaning the Print Head, power light flashes, and the printer makes noise. - stylus photo parts
 |
UPC - 010343838550
View all Epson 2000P manuals
Add to My Manuals
Save this manual to your list of manuals |
Page 9 highlights
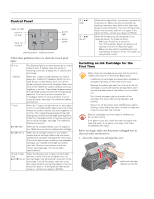
6. Unwrap the ink cartridges, then remove only the yellow part of the tape seal on top. EPSON Stylus Photo 2000P 8. Press down the ink cartridge clamp until it locks in place. (The color clamp is a bit harder to close than the black clamp.) black ink cartridge color ink cartridge don't touch the green chips You must remove the yellow tape from the top of the cartridge or you will permanently damage it. Don't pull off any other part of the label or try to remove the clear seal underneath the cartridge. Don't touch the green circuit board on the back of the cartridge; you may inhibit normal operation and printing. 7. Tilt the ink cartridge forward slightly as you lower it into its holder. Hang the tabs at the back of the cartridge on the hooks on the holder clamps. tabs hooks Don't place the cartridge tabs under the hooks on the holder clamp; you may damage the clamp when you close it. 9. If you need to replace the other ink cartridge, repeat steps 4 through 8 before continuing with step 10. 10. Press the yellow ink cartridge replacement button and close the printer cover. The printer moves the print head and begins charging the ink delivery system. The Ppower light flashes, and the printer makes noise. Charging takes about one minute. When it's finished, the Ppower light stops flashing and stays on. Never turn off the printer while the Ppower light is flashing, unless the printer hasn't moved or made noise for more than 5 minutes. Cleaning the Print Head If your printed image is unexpectedly light or faint, or has missing bands of color, you may need to clean the print head. This unclogs the nozzles so they can deliver ink properly. Cleaning the print head uses ink, so clean it only if print quality declines. You can clean the print head in either of the following ways: t using the Head Cleaning utility (when the printer is connected to a local port, not over a network), as described below t using the printer's control panel buttons, as described on page 10 When you don't turn on your printer for a long time, the print quality can decline. It's a good idea to turn on your printer at least once a month to maintain good print quality. 6/00 EPSON Stylus Photo 2000P - 9
-
 1
1 -
2
-
3
-
 4
4 -
 5
5 -
 6
6 -
 7
7 -
 8
8 -
 9
9 -
 10
10 -
 11
11 -
 12
12
 |
 |
