Epson 2080 User Manual - Page 141
Using the Error Indicators, more control panel lights are on or flashing or the printer beeps
 |
View all Epson 2080 manuals
Add to My Manuals
Save this manual to your list of manuals |
Page 141 highlights
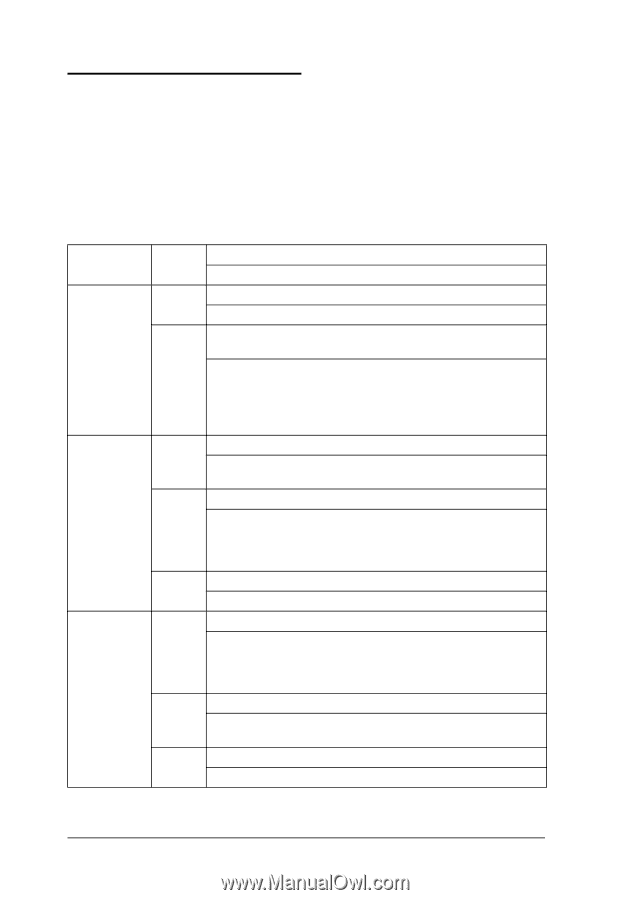
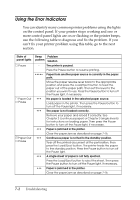
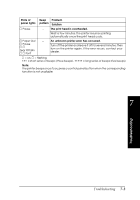
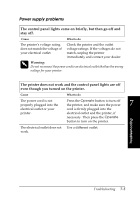
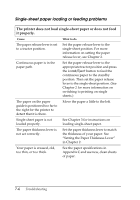
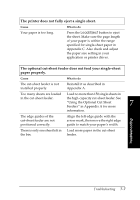
Using the Error Indicators You can identify many common printer problems using the lights on the control panel. If your printer stops working and one or more control panel lights are on or flashing or the printer beeps, use the following table to diagnose and fix the problem. If you can't fix your printer problem using this table, go to the next section. State of panel lights n Pause n Paper Out n Pause f Paper Out n Pause Beep Problem pattern Solution - The printer is paused. Press the Pause button to resume printing. Paper from another paper source is currently in the paper path. Move the paper release lever back to the appropriate position and press the Load/Eject button to feed the paper out of the paper path. Then set the lever to the position you want to use. Press the Pause button to turn off the Pause light, if necessary. ••• No paper is loaded in the selected paper source. Load paper in the printer. Then press the Pause button to turn off the Pause light, if necessary. ••• The paper is not loaded correctly. Remove your paper and reload it correctly. See Chapter 2 (continuous paper) or Chapter 3 (single sheets) for instructions on loading paper. Then press the Pause button to turn off the Pause light, if necessary. ••• Paper is jammed in the printer. Clear the paper jam as described on page 7-16. ••• Continuous paper is not fed to the standby position. Tear off the printed document at the perforation; then press the Load/Eject button. The printer feeds the paper to the standby position. Press the Pause button to turn off the Pause light. ••• A single sheet of paper is not fully ejected. Press the Load/Eject button to eject the sheet. Then press the Pause button to turn off the Pause light, if necessary. ••• Paper is jammed in the printer. Clear the paper jam as described on page 7-16. 7-2 Troubleshooting
-
 1
1 -
2
-
3
-
4
-
5
-
6
-
7
-
8
-
9
-
10
-
11
-
12
-
13
-
14
-
15
-
16
-
17
-
18
-
19
-
20
-
21
-
22
-
23
-
24
-
25
-
26
-
27
-
28
-
29
-
30
-
31
-
32
-
33
-
34
-
35
-
36
-
37
-
38
-
39
-
40
-
41
-
42
-
43
-
44
-
45
-
46
-
47
-
48
-
49
-
50
-
51
-
52
-
53
-
54
-
55
-
56
-
57
-
58
-
59
-
60
-
61
-
62
-
63
-
64
-
65
-
66
-
67
-
68
-
69
-
70
-
71
-
72
-
73
-
74
-
75
-
76
-
77
-
78
-
79
-
80
-
81
-
82
-
83
-
84
-
85
-
86
-
87
-
88
-
89
-
90
-
91
-
92
-
93
-
94
-
95
-
96
-
97
-
98
-
99
-
100
-
101
-
102
-
103
-
104
-
105
-
106
-
107
-
108
-
109
-
110
-
111
-
112
-
113
-
114
-
115
-
116
-
117
-
118
-
119
-
120
-
121
-
122
-
123
-
124
-
125
-
126
-
127
-
128
-
129
-
130
-
131
-
132
-
133
-
134
-
135
-
 136
136 -
 137
137 -
 138
138 -
 139
139 -
 140
140 -
 141
141 -
 142
142 -
 143
143 -
 144
144 -
 145
145 -
 146
146 -
147
-
148
-
149
-
150
-
151
-
152
-
153
-
154
-
155
-
156
-
157
-
158
-
159
-
160
-
161
-
162
-
163
-
164
-
165
-
166
-
167
-
168
-
169
-
170
-
171
-
172
-
173
-
174
-
175
-
176
-
177
-
178
-
179
-
180
-
181
-
182
-
183
-
184
-
185
-
186
-
187
-
188
-
189
-
190
-
191
-
192
-
193
-
194
-
195
-
196
-
197
-
198
-
199
-
200
-
201
-
202
-
203
-
204
-
205
-
206
-
207
-
208
-
209
-
210
-
211
-
212
-
213
-
214
-
215
-
216
-
217
-
218
-
219
-
220
-
221
-
222
-
223
-
224
-
225
-
226
-
227
-
228
 |
 |