Epson 7880 Product Information Guide - Page 8
Paper Type and Banding, Checking and Cleaning the Print Head, Running a Power Cleaning Cycle - stylus pro printer driver
 |
UPC - 010343866874
View all Epson 7880 manuals
Add to My Manuals
Save this manual to your list of manuals |
Page 8 highlights
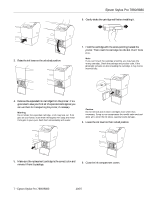
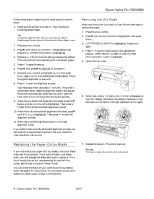
Epson Stylus Pro 7880/9880 Once the cartridge is installed, the printer returns to its READY state. Paper Type and Banding Banding can be caused by several problems, such as clogged print head nozzles or a misaligned print head. It can also be caused by using a paper that is not defined in the Epson printer driver or in a third-party RIP. To correct this problem, make sure you select the correct paper type in the driver. See "Selecting the Correct Media Type Setting" in the User's Guide or Printer Guide. If your paper type is not defined, use the printer's menu system to create a custom paper type. See "Optimizing the Settings for Your Paper" in the User's Guide or Printer Guide. Checking and Cleaning the Print Head If your printed image shows a color shift or horizontal lines, you should check the print head to see if any nozzles are clogged or deflected. If necessary, the printer will automatically run a cleaning cycle to clear the nozzles. 1. Press the Menu button. 2. Press the d button until TEST PRINT is highlighted, then press Menu. NOZZLE CHECK is selected. 3. Press Menu, then press to start printing the nozzle check pattern. The nozzle check pattern is printed and automatically read. If the printer finds clogged nozzles, it runs a cleaning cycle. Caution: Don't run a cleaning cycle while thick media is loaded in the printer. Note: You can run a cleaning cycle by holding down the Menu button for three seconds. You also can check and clean the print head using your printer utility software. See the User's Guide for instructions. Running a Power Cleaning Cycle You can run a power cleaning cycle from the control panel if the normal cleaning process is not sufficient to clear the nozzles. However, the power cycle uses a large quantity of ink, so it is recommended only as a last resort. The cartridges need to be at least 50% full to use power cleaning. You may need to replace a low cartridge to run the cleaning cycle. After cleaning, you can reinsert the old cartridge. 1. Print a nozzle check to make sure the print head needs cleaning. See User's Guide for instructions. 2. Make sure the printer is ready and the red B Ink light on the printer's LCD display is not on or flashing. 3. Press the Menu button. 4. Press the d button until MAINTENANCE is highlighted, then press Menu. 5. Press d until POWER CLEANING is highlighted, then press Menu. Press Menu again, then press to start the power cleaning. 6. Follow the instructions on the LCD display to raise or lower the ink levers. 7. When cleaning is finished and the Pause light stops flashing, print the nozzle check again to confirm that the head is clean. For effective cleaning, always run a nozzle check between cycles. If the pattern is still missing segments or has deflections after a power cleaning cycle, turn the printer off and leave it overnight. Then clean the print head again the following morning with regular cleaning cycles. If you still see no improvement, contact Epson for assistance. Aligning the Print Head Aligning the print head is the most important thing you can do to ensure the best print quality. If banding appears on your prints, if they look grainy or blurry, or if you see misregistration or "ghosting," you may need to align the print head. Although you can align the print head using the printer utility software, it's also easy to align from the printer's control panel. This will do the most thorough job in the shortest time, and it's all automatic. If you haven't already done so, it's a good idea to run a nozzle check before aligning the print head (see User's Guide). This ensures that the print head alignment patterns print correctly. 10/07 Epson Stylus Pro 7880/9880 - 8
-
 1
1 -
2
-
 3
3 -
 4
4 -
 5
5 -
 6
6 -
 7
7 -
 8
8 -
 9
9 -
 10
10 -
 11
11
 |
 |
