Epson 8100i User Manual - Page 78
Creating a Screen Logo or Image - projector mount
 |
View all Epson 8100i manuals
Add to My Manuals
Save this manual to your list of manuals |
Page 78 highlights
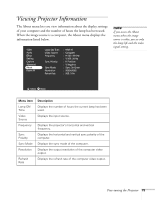
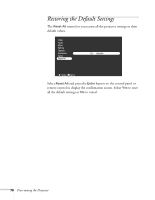
Menu item Rear Projection Ceiling Reset Description Mirrors the projected image on its Y-axis (left-right). Selecting ON turns mirroring on, while OFF turns it off (for a normal image). Turn on this option when projecting from behind onto a transparent screen. Mirrors the projected image on its X-axis (top-bottom). Selecting ON turns mirroring on, while OFF turns it off (for a normal image). Turn this option on when the projector is mounted upside-down from the ceiling. Returns all Advanced menu items to their default settings. Select this item and then press Enter to display the confirmation screen. Next, select Yes and press Enter to reset the Advanced menu. If you change your mind, select No and press Enter to clear the confirmation screen without changing any settings. Creating a Screen Logo or Image You can transfer any image on your computer to the projector, and then use it as the image displayed when the projector is not receiving a signal. You can also set it to be displayed when you press the A/V Mute button on the remote, or as a startup screen. The image can be a company logo, slogan, photograph, or any other image you want to use. Video Audio Effect Setting Capture Advanced About Reset All User's Logo Capture Execute :Select :Enter 72 Fine-tuning the Projector
-
 1
1 -
2
-
3
-
4
-
5
-
6
-
7
-
8
-
9
-
10
-
11
-
12
-
13
-
14
-
15
-
16
-
17
-
18
-
19
-
20
-
21
-
22
-
23
-
24
-
25
-
26
-
27
-
28
-
29
-
30
-
31
-
32
-
33
-
34
-
35
-
36
-
37
-
38
-
39
-
40
-
41
-
42
-
43
-
44
-
45
-
46
-
47
-
48
-
49
-
50
-
51
-
52
-
53
-
54
-
55
-
56
-
57
-
58
-
59
-
60
-
61
-
62
-
63
-
64
-
65
-
66
-
67
-
68
-
69
-
70
-
71
-
72
-
 73
73 -
 74
74 -
 75
75 -
 76
76 -
 77
77 -
 78
78 -
 79
79 -
 80
80 -
 81
81 -
 82
82 -
 83
83 -
84
-
85
-
86
-
87
-
88
-
89
-
90
-
91
-
92
-
93
-
94
-
95
-
96
-
97
-
98
-
99
-
100
-
101
-
102
-
103
-
104
-
105
-
106
-
107
-
108
-
109
-
110
-
111
-
112
-
113
-
114
-
115
-
116
-
117
-
118
-
119
-
120
 |
 |
