Epson 8300NL Product Information Guide - Page 5
Connecting the Projector, Type of connections, Viewing Images on an External Monitor - lens
 |
UPC - 010343846029
View all Epson 8300NL manuals
Add to My Manuals
Save this manual to your list of manuals |
Page 5 highlights
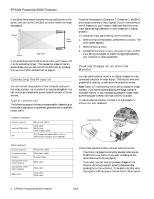
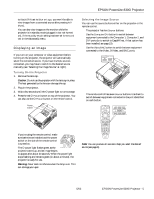
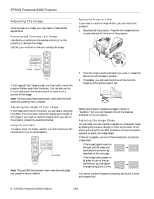
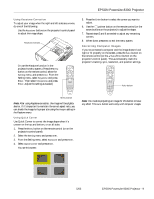
EPSON PowerLite 8300i Projector If you place the projector between the top and bottom of the screen, you can use the Lens Shift to raise or lower the image (see page 8). Screen Ideal height Side View If you place the projector below screen level, you'll have to tilt it up by extending its feet. This causes the image to lose its square shape, but you can correct the distortion by pressing the Keystone button as described on page 9. Connecting the Projector You can connect the projector to four computer sources or five video sources-up to a total of six sources altogether. You can include an independent sound channel for each of the six sources. Type of connections The following types of connections are possible, depending on the kinds of signals your equipment generates and its available output ports: Computer equipment Output signal Analog RGB video DVI Required cable VGA cable BNC cable VGA-to-BNC cable DVI-D dual-link cable (DVI-to-DVI or DFP-to-DVI available from EPSON) Note that the projector's Computer 1, Computer 2, and BNC ports accept a variety of input signals. If you're connecting to one of these ports, you'll need to make sure that the correct input signal setting is selected, or your image won't display properly. To change the input signal setting, do the following: 1. After turning on the projector, press the Menu button. The menu screen appears. 2. Select the Setting menu. 3. Change the Computer 1 Input, Computer 2 Input, or BNC Input setting, as needed, to match the signal generated by your computer or video equipment. Viewing Images on an External Monitor You can use an external monitor to display images from any connected computer or video source. This lets you view your presentation close-up, as well as on the projection screen. Note: Some LCD monitors may not be able to display the image correctly. If you have trouble displaying the image, connect a multiscan monitor. If you're projecting computer images, make sure the computer's refresh rate is set to 65 Hz or greater. To use an external monitor, connect it to the projector's Monitor Out port, as shown: External monitor Video equipment Output signal Composite video S-video Component video- NTSC (YCbCr) Component video- HDTV (YPbPr) RGB video Required cable RCA video cable S-video cable BNC cable BNC cable VGA cable BNC cable Follow these guidelines when using an external monitor: ❏ The monitor displays the currently selected video source. Press the Preview button if you want to display all the active sources at once (see page 6). ❏ If you want, you can view (or preview) images on the monitor while the projection screen is darkened after pressing the A/V Mute button. To be able to do this, enter the projector's Setting menu, then set the A/V Mute option 4 - EPSON PowerLite 8300i Projector 5/03
-
 1
1 -
 2
2 -
 3
3 -
 4
4 -
 5
5 -
 6
6 -
 7
7 -
 8
8 -
 9
9 -
 10
10 -
 11
11 -
12
-
13
-
14
-
15
-
16
-
17
-
18
-
19
-
20
 |
 |
