Epson 830p Product Information Guide - Page 11
Using the Control Panel, Cleaning the Lens, Cleaning the Projector, Cleaning the Air Filters
 |
UPC - 010343851177
View all Epson 830p manuals
Add to My Manuals
Save this manual to your list of manuals |
Page 11 highlights
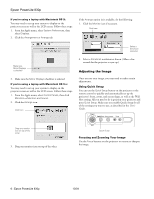
Epson PowerLite 830p Using the Control Panel Control Panel Button Functions Button Power Quick Setup Source Search Zoom Focus Help Computer/ Component Video/ S-Video Menu Esc Enter Tracking buttons Sync buttons Shift A/V Mute Resize Keystone buttons Volume Function Turns the projector on or off. Automatically adjusts the image. Adjustments are pre-selected in the projector menus. Automatically finds a source image from a connected device. Zooms the projected image. Focuses the projected image. Displays the on-screen help. Switches the source signal between equipment connected to the Computer/Component ports. Switches the source signal among equipment connected to the Video or S-Video ports. Displays the on-screen menu system. Pressing Esc while viewing a menu displays the previous menu. Use Enter button to select an option when the menu or help system is active. Let you manually eliminate vertical banding that may be present in some computer images. Use the Tracking buttons as arrow keys to navigate the onscreen menu and help systems. Let you correct blurriness that may be present in some computer images. Use the Sync buttons as arrow keys to navigate the on-screen menu and help systems. Press and hold to use the Tracking and Sync buttons. Turns off audio and video and displays the black, blue, or user logo background. Press it again to turn audio and video back on. Adjusts how an image fits into the display area. Corrects an image that is keystone-shaped or wider on one side. (When used while pressing the Shift button, these function as Sync and Tracking buttons; see descriptions above.) Increases or decreases the sound. Cleaning the Lens Clean the lens whenever you notice dirt or dust on the surface. Use a canister of compressed air to remove dust. To remove dirt or smears on the lens, use lens-cleaning paper. If necessary, moisten a soft cloth with lens cleaner and gently wipe the lens surface. Caution: Do not use glass cleaner to clean the lens. Cleaning the Projector Before you clean the case, first turn off the projector and unplug the power cord. To remove dirt or dust, wipe the case with a soft, dry, lint-free cloth. To remove stubborn dirt or stains, moisten a soft cloth with water and a mild detergent. Then wipe the case. Caution: Do not use wax, alcohol, benzene, paint thinner, or other chemical detergents. These can damage the case. Cleaning the Air Filters and Vents Clean the air filters and air intake vents after every 100 hours of use. If they are not cleaned periodically, they can become clogged with dust, preventing proper ventilation. This can cause overheating and damage the projector. Note: To order replacement air filters, request part number V13H134A07. Follow these steps: 1. Turn off the projector. Wait for the Power light to stop flashing, then unplug the power cord. 2. To clean the intake vents, use a small vacuum cleaner designed for computers and other office equipment. If you don't have one, gently clean the vents with a soft brush (such as an artist's paintbrush). 10/04 Epson PowerLite 830p - 11
-
 1
1 -
2
-
3
-
4
-
5
-
 6
6 -
 7
7 -
 8
8 -
 9
9 -
 10
10 -
 11
11 -
 12
12 -
 13
13 -
 14
14
 |
 |
