Epson 830p Product Information Guide - Page 6
Adjusting the Image - powerlite resolution
 |
UPC - 010343851177
View all Epson 830p manuals
Add to My Manuals
Save this manual to your list of manuals |
Page 6 highlights
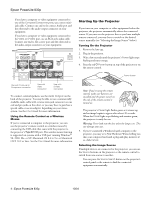
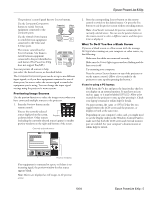
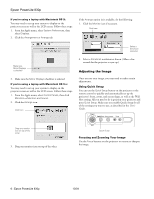
Epson PowerLite 830p If you're using a laptop with Macintosh OS X: You may need to set up your system to display on the projector screen as well as the LCD screen. Follow these steps: 1. From the Apple menu, select System Preferences, then select Displays. 2. Click the Arrangement or Arrange tab. If the Arrange option isn't available, do the following: 1. Click the Monitor icon if necessary. Click here Select a Simulscan resolution Make sure Mirror Displays is checked 3. Make sure the Mirror Displays checkbox is selected. If you're using a laptop with Macintosh OS 9.x: You may need to set up your system to display on the projector screen as well as the LCD screen. Follow these steps: 1. From the Apple menu, select Control Panels, then click Monitors or Monitors and Sound. 2. Click the Arrange icon. Click here 2. Select a Simulscan resolution as shown. (Allow a few seconds for the projector to sync up.) Adjusting the Image Once you see your image, you may need to make certain adjustments. Using Quick Setup You can use the Quick Setup button on the projector or the remote control to quickly and automatically set up the projector's focus, zoom, and screen shape, as well as the Wall Shot setting. All you need to do is position your projector and press Quick Setup. Make sure you enable Quick Setup for all of the settings you want to use, as described in the User's Guide. Drag one monitor icon on top of the other 3. Drag one monitor icon on top of the other. Quick Setup Focusing and Zooming Your Image Use the Focus buttons on the projector or remote to sharpen the image. 6 - Epson PowerLite 830p 10/04
-
 1
1 -
 2
2 -
 3
3 -
 4
4 -
 5
5 -
 6
6 -
 7
7 -
 8
8 -
 9
9 -
 10
10 -
 11
11 -
 12
12 -
13
-
14
 |
 |
