Epson 830p Product Information Guide - Page 4
Starting Up the Projector - powerlite manual
 |
UPC - 010343851177
View all Epson 830p manuals
Add to My Manuals
Save this manual to your list of manuals |
Page 4 highlights
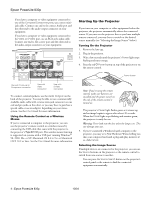
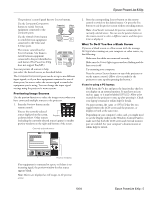
Epson PowerLite 830p ❏ If you have a computer or video equipment connected to one of the Computer/Component ports, use a stereo minijack cable. Connect one end to the correct Audio port and the other end to the audio-output connector on your equipment. ❏ If you have a computer or video equipment connected to the Video or S-Video port, use an RCA-style audio cable. Connect one end to the correct port and the other end to the audio-output connector on your equipment. Starting Up the Projector If you turn on your computer or video equipment before the projector, the projector automatically selects the connected source. If you turn on the projector first or you have multiple sources connected, you may have to switch to the desired source manually (see "Selecting the Image Source" below). Turning On the Projector 1. Remove the lens cap. 2. Plug in the projector. 3. Wait a few seconds until the projector's Power light stops flashing and turns orange. 4. Press the red P Power button on top of the projector or on the remote control. Power button Use with Computer or Component connection Use with Video connection Use with S-Video connection To connect external speakers, use the Audio Out port on the back of the projector. You may be able to use a commercially available audio cable with a stereo mini-jack connector on one end and pin jacks on the other, or you may have to purchase a special cable or use an adapter, depending on your stereo system. See the User's Guide for more information. Using the Remote Control as a Wireless Mouse If you've connected a computer to the projector, you can use the projector's remote control as a wireless mouse by connecting the USB cable that came with the projector to the projector's Type B USB port. The wireless mouse function is supported on systems with a USB port running Windows® 98, 2000, Me, or XP, Macintosh OS 8.6 to 9.x, or Macintosh OS X 10.2 or later. See the User's Guide for more information. Note: If you're using the remote control, make sure batteries are installed and the power switch on the side of the remote control is turned on. The projector's Power light flashes green as it warms up, and an image begins to appear after about 30 seconds. When the Power light stops flashing and remains green, the projector is ready for use. Warning: Never look into the lens when the lamp is on. This can damage your eyes. 5. If you've connected a Windows-based computer to the projector, you may see a New Hardware Wizard telling you that your computer has found a plug-and-play monitor; if so, click Cancel. Selecting the Image Source If multiple devices are connected to the projector, you can use the Source buttons on the projector or the remote control to switch from one source to another: ❏ You can press the Source Search button on the projector's control panel or the remote to find the connected equipment automatically. 4 - Epson PowerLite 830p 10/04
-
 1
1 -
 2
2 -
 3
3 -
 4
4 -
 5
5 -
 6
6 -
 7
7 -
 8
8 -
 9
9 -
 10
10 -
11
-
12
-
13
-
14
 |
 |
