Epson BrightLink 450Wi Installation Guide - Page 24
AE BI AE AI BE AI, Use the top adjustment dial to adjust the vertical tilt
 |
View all Epson BrightLink 450Wi manuals
Add to My Manuals
Save this manual to your list of manuals |
Page 24 highlights
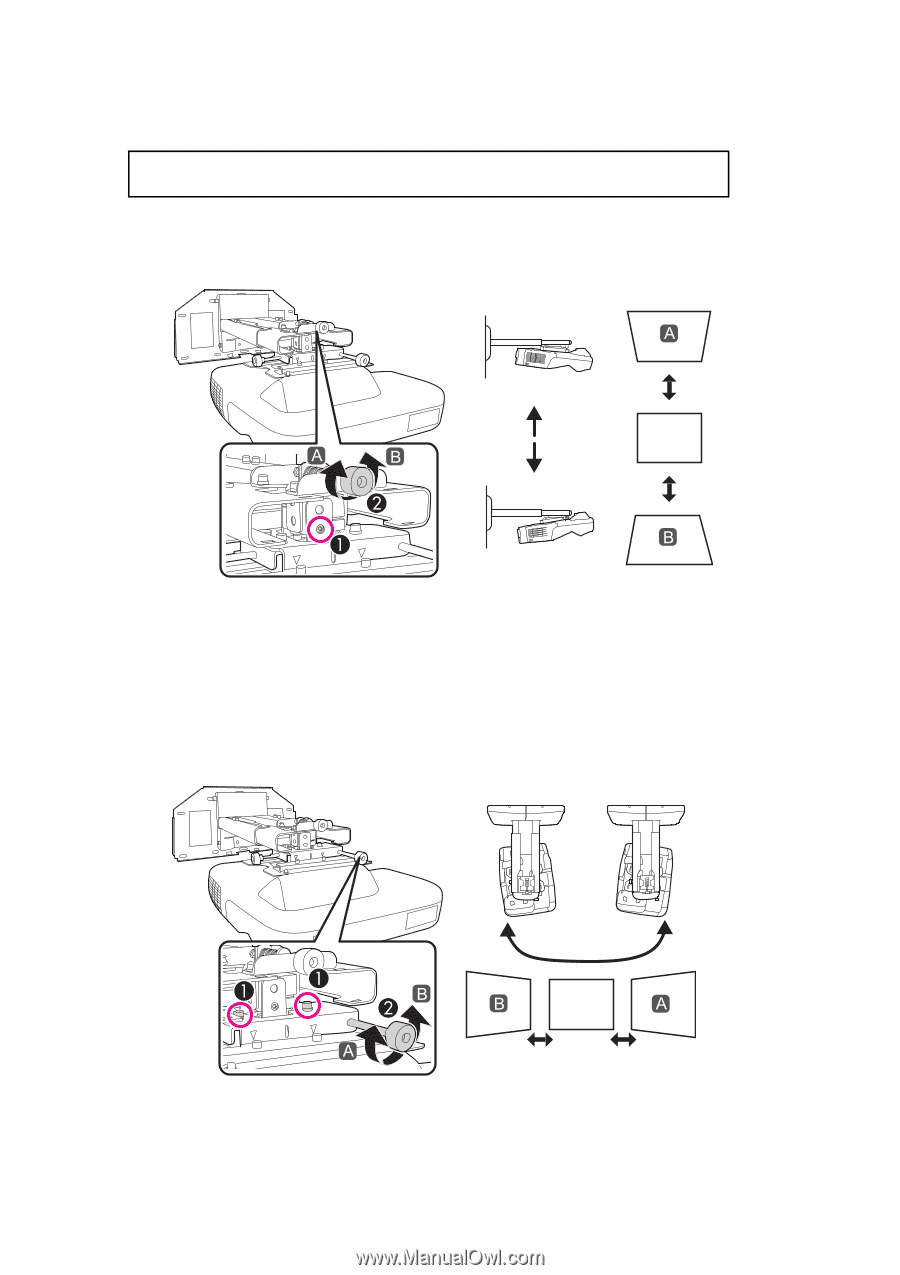
E Use the top adjustment dial to adjust the vertical tilt E I Repeat steps to as necessary. (1) Loosen the screw that corresponds to the top adjustment dial (A). (2) Turn the adjustment dial to adjust the vertical tilt (B). E I (3) After you finish making all of the adjustments in steps to , tighten the screw you loosened in A. F Use the right adjustment dial to adjust the horizontal rotation (1) Loosen the two screws that correspond to the right adjustment dial (A). (2) Turn the adjustment dial to adjust the horizontal rotation (B). E I (3) After you finish making all of the adjustments in steps to , tighten the two screws you loosened in A. 24
-
 1
1 -
2
-
3
-
4
-
5
-
6
-
7
-
8
-
9
-
10
-
11
-
12
-
13
-
14
-
15
-
16
-
17
-
18
-
 19
19 -
 20
20 -
 21
21 -
 22
22 -
 23
23 -
 24
24 -
 25
25 -
 26
26 -
 27
27 -
 28
28 -
 29
29 -
30
-
31
-
32
-
33
-
34
-
35
-
36
-
37
-
38
-
39
-
40
-
41
-
42
-
43
-
44
-
45
-
46
-
47
-
48
-
49
-
50
-
51
-
52
-
53
-
54
-
55
-
56
-
57
-
58
-
59
-
60
 |
 |
24
E
Use the top adjustment dial to adjust the vertical tilt
(1)
Loosen the screw that corresponds to the top adjustment dial (
A
).
(2)
Turn the adjustment dial to adjust the vertical tilt (
B
).
(3)
After you finish making all of the adjustments in steps
E
to
I
, tighten the screw you
loosened in
A
.
F
Use the right adjustment dial to adjust the horizontal rotation
(1)
Loosen the two screws that correspond to the right adjustment dial (
A
).
(2)
Turn the adjustment dial to adjust the horizontal rotation (
B
).
(3)
After you finish making all of the adjustments in steps
E
to
I
, tighten the two screws you
loosened in
A
.
Repeat steps
E
to
I
as necessary.