Epson C80N Start Here Card - Page 2
Power On, Install Ink Cartridges
 |
UPC - 010343840935
View all Epson C80N manuals
Add to My Manuals
Save this manual to your list of manuals |
Page 2 highlights
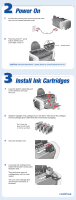
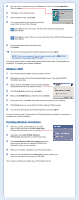
2 Power On 1 Connect the printer's power cord to the printer, then plug it into a standard electrical outlet. 2 Press the printer's power button until the green power light comes on. Power button CAUTION: Use only the printer's power button to turn the printer on or off. 3 Install Ink Cartridges 1 Lower the printer's output tray, pull out the extension and open the cover. 2 Shake the package of ink cartridges four or five times. Then remove the cartridges from the package. (Don't shake them after removing the packaging.) Don't touch the green circuit boards or remove any labels 3 Open the cartridge cover. 4 Lower each ink cartridge into its holder with the green circuit board facing the front. Then gently push each ink cartridge down until it is firmly seated. The color of the cartridge label should match the marker on the holder. continue
-
 1
1 -
 2
2 -
 3
3 -
 4
4 -
 5
5 -
 6
6
 |
 |
