Epson C80N Start Here Card - Page 6
Macintosh, Add Your Printer in Mac OS X - drivers
 |
UPC - 010343840935
View all Epson C80N manuals
Add to My Manuals
Save this manual to your list of manuals |
Page 6 highlights
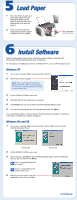
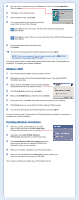
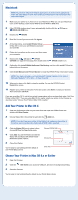
Macintosh NOTE: To print from Macintosh Classic applications as well as OS X applications, follow the steps below in OS X, then restart your Macintosh in OS 9 and follow the steps below again. 1 Make sure your printer is on, then turn on your Macintosh. When you see your Macintosh icons on the desktop, insert the CD-ROM in the CD-ROM or DVD drive. 2 If the CD-ROM window doesn't open automatically, double-click the CD Icon or EPSON CD-ROM icon. 3 Double-click EPSON. 4 Read the License Agreement and click Agree. 5 At the Main Menu, click Install Printer Driver. In Mac OS X, enter your administrator password and click OK. 6 Follow the instructions on the screen and then restart your computer. 7 Double-click the CD Icon or EPSON CD-ROM icon again (if necessary), then double-click the EPSON installer icon. 8 Optionally, click Install EPSON Software Film Factory and then click Install. Follow the instructions on the screen. 9 Click Install Manual and Printer Movies to install the EPSON Printer Information Center. NOTE: You need a browser - such as Microsoft Internet Explorer 4.0 or later or Netscape Navigator® 4.0 or later - to view the guide. 10 When you're done, click Exit to close the installer. You see the EPSON Product Registration screen. 11 Register your printer as instructed. At the last screen, click Done or close your browser. Then remove the CD-ROM. If you are using Mac OS X, add all your printer's page setup options as described under "Add Your Printer in Mac OS X." If you are using Mac OS 9 or earlier, select your printer in the Chooser as described under "Choose Your Printer in Mac OS 9 or earlier." Add Your Printer in Mac OS X 1 Open the Applications folder on your hard drive, then open the Utilities folder and double-click Print Center. 2 Choose Stylus C84 in the printer list and click the Add icon. NOTE: If you don't see your printer in the Printer List, make sure the printer is turned on and connected. Also make sure EPSON USB is selected. 3 Click the Stylus C84 icon to select it, then choose All from the Page Setup menu. 4 Click Add. You see the Printer List with the Stylus C84 and Stylus C84 (Sheet Feeder Borderless) printer options. 5 Close Print Center. You're ready to start printing! See the details in your Printer Basics book. Choose EPSON USB Choose All Click Add Choose Your Printer in Mac OS 9.x or Earlier 1 Open the Chooser. 2 Click the C84 Series icon, click your USB port, and turn on background printing. 3 Close the Chooser. You're ready to start printing! See the details in your Printer Basics book. EPSON and EPSON Stylus are registered trademarks of SEIKO EPSON CORPORATION. EPSON Software is a trademark of Epson America, Inc. General Notice: Other product names used herein are for identification purposes only and may be trademarks of their respective owners. EPSON disclaims any and all rights in those marks. Copyright © 2003 by Epson America, Inc. 8/03 Printed in XXXXXX XX.XX-XX
-
 1
1 -
 2
2 -
 3
3 -
 4
4 -
 5
5 -
 6
6
 |
 |