Epson CX9400Fax Product Information Guide - Page 11
Printing From a Memory Card, Inserting Your Camera’s Memory Card, Selecting Photos From the Screen - series
 |
UPC - 010343865815
View all Epson CX9400Fax manuals
Add to My Manuals
Save this manual to your list of manuals |
Page 11 highlights
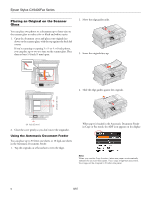
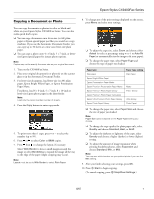
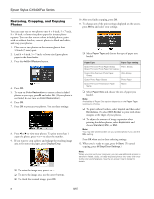
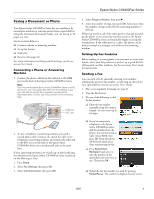
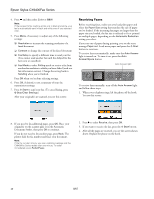
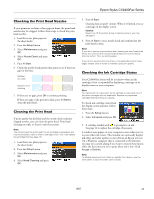
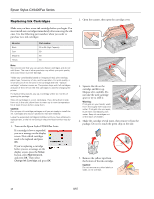
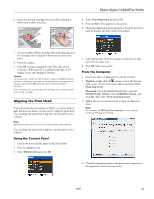
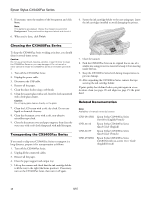
Epson Stylus CX9400Fax Series Printing From a Memory Card The Epson Stylus CX9400Fax Series lets you print photos directly from your digital camera's memory card. Once your card is inserted, you can also print photos using an index sheet or your camera's DPOF settings, or transfer files to and from the card. You can also print by connecting your camera directly. The instructions below explain how to insert a memory card and select photos to print. See the on-screen User's Guide for more information. Inserting Your Camera's Memory Card 1. Insert the card into the correct slot, as shown. Insert just one card at a time. The memory card access light flashes, then stays on. Left slot Right slot Memory card access light SD SDHC miniSD* miniSDHC* microSD* microSDHC* MultiMediaCard Memory Stick Memory Stick Duo* Memory Stick PRO Memory Stick PRO Duo* MagicGate Memory Stick MagicGate Memory Stick Duo* xD-Picture Card xD-Picture Card Type H xD-Picture Card Type M * Adapter required CompactFlash Microdrive The image files on your card must meet these requirements: File format Image size Number of files JPEG with the Exif version 2.21 standard 80 × 80 pixels to 9200 × 9200 pixels Up to 999 2. To remove the card, make sure the memory card access light is not flashing, then pull the card straight out of its slot. Caution: Do not remove the card or turn off the Epson Stylus CX9400Fax Series while the memory card access light is flashing; you may lose data on the card. Selecting Photos From the Screen You can select individual photos for printing as you view them on the display screen. 1. Load Epson photo paper. 2. Press the Memory Card button. You see this screen: 3. Select View and Print Photos, then press OK. 4. Press l or r to move through your photos and display the one you want to print. 5. Press + to select the number of copies you want of that photo. 6. To crop the photo, press the Display/Crop button. ❏ To resize the image area, press + or -. ❏ To move the image area, use the arrow buttons. ❏ To rotate the image area, press Menu to toggle between vertical and horizontal orientation. ❏ To check the zoomed image, press OK. 7. Press l or r to view other photos, select the number of copies, and crop, if desired. 8. To print borderless photos on 4 × 6-inch Epson Premium Photo Paper Glossy or Semi-gloss, press x Start. To change your paper type or any of the other print settings, press Menu. Select your settings and press OK. (See page 12 for more information.) 9. Press x Start to start printing. (To cancel printing, press y Stop/Clear Settings.) 8/07 11
-
 1
1 -
2
-
3
-
4
-
5
-
 6
6 -
 7
7 -
 8
8 -
 9
9 -
 10
10 -
 11
11 -
 12
12 -
 13
13 -
 14
14 -
 15
15 -
 16
16
 |
 |
