Epson CX9400Fax Product Information Guide - Page 9
Faxing a Document or Photo, Connecting a Phone or Answering Machine, Setting Up Fax Features - manual
 |
UPC - 010343865815
View all Epson CX9400Fax manuals
Add to My Manuals
Save this manual to your list of manuals |
Page 9 highlights
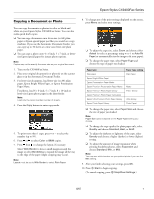
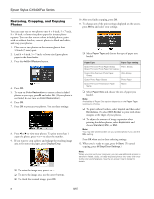
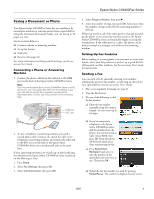
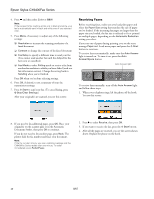
Epson Stylus CX9400Fax Series Faxing a Document or Photo Your Epson Stylus CX9400Fax Series lets you send faxes by entering fax numbers or selecting entries from a speed dial list. Using the Automatic Document Feeder, you can fax up to 30 pages at a time. See the sections below to: ❏ Connect a phone or answering machine ❏ Set up fax features ❏ Send a fax ❏ Receive a fax (page 10) For more information on faxing and fax settings, see the onscreen User's Guide. Connecting a Phone or Answering Machine 1. Connect the phone cable from the wall jack to the LINE port on the back of the Epson Stylus CX9400Fax Series. Note: If you're connecting the Epson Stylus CX9400Fax Series to a DSL phone line, you must plug a DSL filter into the wall jack or you won't be able to use the fax or telephone equipment as described below. Contact your DSL provider for the necessary filter. LINE port EXT. port 2. To use a telephone or answering machine, you need a second phone cable. Connect one end of the cable to the telephone or answering machine, and connect the other end to the EXT. port on the back of the Epson Stylus CX9400Fax Series (or to another wall jack on the same line). If your answering machine is set to pick up on the fourth ring, you should set the Epson Stylus CX9400Fax Series to pick up on the fifth ring or later: 1. Press Setup. 2. Select Fax Settings, then press OK. 3. Select Communication, then press OK. 4. Select Rings to Answer, then press r. 5. Select the number of rings, then press OK. Select more than the number of rings needed for the answering machine to pick up. When you receive a call, if the other party is a fax and you pick up the phone or the answering machine answers, the Epson Stylus CX9400Fax Series automatically begins receiving the transmission. If the other party is a caller, the phone can be used as normal or a message can be left on the answering machine. Setting Up Fax Features Before sending or receiving faxes, you may want to create a fax header, select your fax preferences, and set up a speed dial list of frequently used fax numbers. See the on-screen User's Guide for instructions. Sending a Fax You can send a fax by manually entering a fax number, redialing the previous fax number, or selecting an entry from your speed dial list (see the on-screen User's Guide). 1. Place your original(s) for faxing (see page 6). 2. Press the Fax button. 3. Do one of the following to dial the fax number: ❏ Enter the fax number manually using the numeric keypad. You can enter up to 64 digits. ❏ If you've connected a telephone to the Epson Stylus CX9400Fax Series, dial the number from the phone. You see the screen at right. Select Send, then press OK. Keep the phone off the hook until you're done transmitting the fax. ❏ Press Speed Dial/ Backspace and select or type the number of the speed dial entry you want to use. Then press OK. ❏ Redial the last fax number you used by pressing Redial/Pause. The number is displayed on the screen. 8/07 9
-
 1
1 -
2
-
3
-
 4
4 -
 5
5 -
 6
6 -
 7
7 -
 8
8 -
 9
9 -
 10
10 -
 11
11 -
 12
12 -
 13
13 -
 14
14 -
15
-
16
 |
 |
