Epson CX9400Fax Start Here Book (with wireless print server) - Page 14
Configuring the Print Server with Advanced Installation - manual
 |
UPC - 010343865815
View all Epson CX9400Fax manuals
Add to My Manuals
Save this manual to your list of manuals |
Page 14 highlights
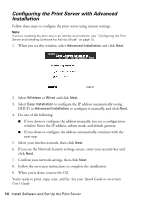
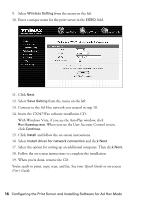
Configuring the Print Server with Advanced Installation Follow these steps to configure the print server using custom settings: Note: If you're installing the all-in-one in an Ad Hoc environment, see "Configuring the Print Server and Installing Software for Ad Hoc Mode" on page 15. 1. When you see this window, select Advanced Installation and click Next. 2. Select Wireless or Wired and click Next. 3. Select Easy Installation to configure the IP address automatically (using DHCP) or Advanced Installation to configure it manually, and click Next. 4. Do one of the following: ■ If you chose to configure the address manually, you see a configuration window. Enter the IP address, subnet mask, and default gateway. ■ If you chose to configure the address automatically, continue with the next step. 5. Select your wireless network, then click Next. 6. If you see the Network Security settings screen, enter your security key and click Next. 7. Confirm your network settings, then click Next. 8. Follow the on-screen instructions to complete the installation. 9. When you're done, remove the CD. You're ready to print, copy, scan, and fax. See your Quick Guide or on-screen User's Guide. 14 Install Software and Set Up the Print Server
-
 1
1 -
2
-
3
-
4
-
5
-
6
-
7
-
8
-
 9
9 -
 10
10 -
 11
11 -
 12
12 -
 13
13 -
 14
14 -
 15
15 -
 16
16 -
 17
17 -
 18
18 -
 19
19 -
20
-
21
-
22
-
23
-
24
 |
 |