Epson FX-100 User Manual - Page 177
Strata Program
 |
View all Epson FX-100 manuals
Add to My Manuals
Save this manual to your list of manuals |
Page 177 highlights
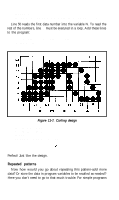
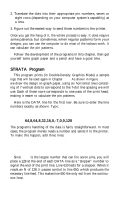
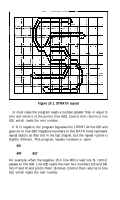
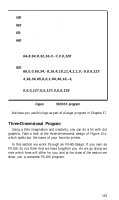
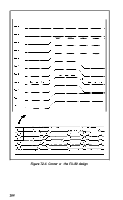
2. Translate the dots into their appropriate pin numbers, seven or eight rows (depending on your computer system's capability) at a time. 3. Figure out the easiest way to send those numbers to the printer. Once you get the hang of it, the whole process is easy. It does require some patience, but sometimes, when regular patterns form your designs, you can use the computer to do most of the tedious work. It can calculate the pin patterns. Follow the development of the programs in this chapter, then get yourself some graph paper and a pencil and have a good time. STRATA Program This program prints (in Double-Density Graphics Mode) a sample logo that will be used again in Chapter 17. As shown in Figure 12-1, we drew the design on graph paper, using six horizontal rows consisting of 7 vertical dots to correspond to the 7-dot line spacing we will use. Each of these rows corresponds to one pass of the print head, making it easier to calculate the pin patterns. Here is the DATA line for the first row. Be sure to enter the line numbers exactly as shown. Type: NEW 800 DATA 0,1,2,4,11,18,36,72,-16,16, 64,8,64,8,32,16,0,-7,0,0,128 The program's handling of the data is fairly straightforward. In most cases, the program merely reads a number and sends it to the printer. To make this happen, add three lines: 610 READ N: IF N=128 THEN 650 620 IF N>=$ THEN PRINT CHR$(N;: GOTO 610 650 LPRINT Since 127 is the largest number that can fire seven pins, you will place a 128 at the end of each DATA line as a "stopper" number to signal the end of the print line. Line 610 tests for a stopper. When it reads an N of 128, it passes control to line 650, which produces the necessary line feed. This makes line 650 the only exit from the continuous loop. 160
-
 1
1 -
2
-
3
-
4
-
5
-
6
-
7
-
8
-
9
-
10
-
11
-
12
-
13
-
14
-
15
-
16
-
17
-
18
-
19
-
20
-
21
-
22
-
23
-
24
-
25
-
26
-
27
-
28
-
29
-
30
-
31
-
32
-
33
-
34
-
35
-
36
-
37
-
38
-
39
-
40
-
41
-
42
-
43
-
44
-
45
-
46
-
47
-
48
-
49
-
50
-
51
-
52
-
53
-
54
-
55
-
56
-
57
-
58
-
59
-
60
-
61
-
62
-
63
-
64
-
65
-
66
-
67
-
68
-
69
-
70
-
71
-
72
-
73
-
74
-
75
-
76
-
77
-
78
-
79
-
80
-
81
-
82
-
83
-
84
-
85
-
86
-
87
-
88
-
89
-
90
-
91
-
92
-
93
-
94
-
95
-
96
-
97
-
98
-
99
-
100
-
101
-
102
-
103
-
104
-
105
-
106
-
107
-
108
-
109
-
110
-
111
-
112
-
113
-
114
-
115
-
116
-
117
-
118
-
119
-
120
-
121
-
122
-
123
-
124
-
125
-
126
-
127
-
128
-
129
-
130
-
131
-
132
-
133
-
134
-
135
-
136
-
137
-
138
-
139
-
140
-
141
-
142
-
143
-
144
-
145
-
146
-
147
-
148
-
149
-
150
-
151
-
152
-
153
-
154
-
155
-
156
-
157
-
158
-
159
-
160
-
161
-
162
-
163
-
164
-
165
-
166
-
167
-
168
-
169
-
170
-
171
-
 172
172 -
 173
173 -
 174
174 -
 175
175 -
 176
176 -
 177
177 -
 178
178 -
 179
179 -
 180
180 -
 181
181 -
 182
182 -
183
-
184
-
185
-
186
-
187
-
188
-
189
-
190
-
191
-
192
-
193
-
194
-
195
-
196
-
197
-
198
-
199
-
200
-
201
-
202
-
203
-
204
-
205
-
206
-
207
-
208
-
209
-
210
-
211
-
212
-
213
-
214
-
215
-
216
-
217
-
218
-
219
-
220
-
221
-
222
-
223
-
224
-
225
-
226
-
227
-
228
-
229
-
230
-
231
-
232
-
233
-
234
-
235
-
236
-
237
-
238
-
239
-
240
-
241
-
242
-
243
-
244
-
245
-
246
-
247
-
248
-
249
-
250
-
251
-
252
-
253
-
254
-
255
-
256
-
257
-
258
-
259
-
260
-
261
-
262
-
263
-
264
-
265
-
266
-
267
-
268
 |
 |