Epson FX-980 Product Information Guide - Page 12
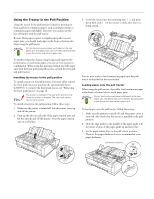
Using the Front Push Tractor, To load paper onto the front push tractor, follow these steps
 |
View all Epson FX-980 manuals
Add to My Manuals
Save this manual to your list of manuals |
Page 12 highlights
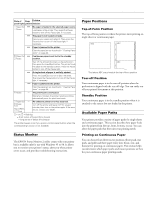
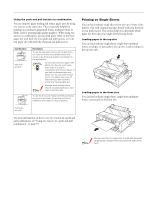
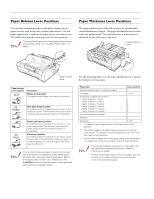
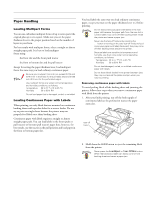
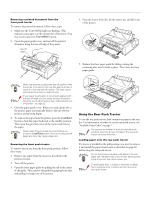
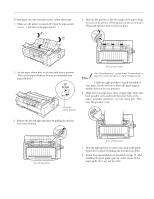
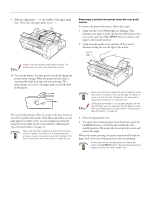
EPSON FX-980 Using the Front Push Tractor To use the front push tractor, load continuous paper in the front slot. For more information on when to use the front push tractor, see "Available Paper Paths" on page 7. Note: The tractors are installed in the front push and rear push positions when the printer is shipped. The rear tractor cannot be removed. Installing the tractor in the front push position If a tractor is installed in the front push position, skip to the next section, "Loading paper onto the front push tractor." If a tractor is installed in the pull position, you need to remove it and install the paper tension unit. To install the tractor in the front push position, follow these steps: 1. Make sure the printer is turned off. Open the front paper guide by (Œ)pulling the tab at the center of the guide. Then remove the guide by grasping both sides () and pulling it straight out of the printer. Loading paper onto the front push tractor To load paper onto the front push tractor, follow these steps: 1. Make sure the printer is turned off. Open the front paper guide by pulling the tab at the center of the guide. Then remove the guide by grasping both sides and pulling it straight out of the printer. Check that the tractor is installed in the front push position. tab 2. Set the paper release lever to the front push tractor position. Then set the paper thickness lever to accommodate your paper thickness. tab 2. Insert the tractor into the mounting slots (Œ) and press down both ends of the tractor () to make sure that it is firmly seated. front push tractor position 3. Release the left and right sprockets by pushing the sprocket lock levers backward. You are now ready to load continuous paper onto the front push tractor as described in the next section. 12 - EPSON FX-980 4/99
-
 1
1 -
2
-
3
-
4
-
5
-
6
-
 7
7 -
 8
8 -
 9
9 -
 10
10 -
 11
11 -
 12
12 -
 13
13 -
 14
14 -
 15
15 -
 16
16 -
 17
17 -
18
-
19
-
20
-
21
-
22
-
23
-
24
-
25
-
26
-
27
 |
 |
