Epson LQ-1170 User Manual - Page 45
Removing Continuous Paper from the Rear Push-Tractor
 |
View all Epson LQ-1170 manuals
Add to My Manuals
Save this manual to your list of manuals |
Page 45 highlights
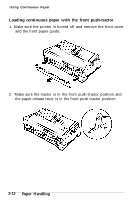
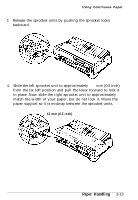
Using Continuous Paper 6. Close the sprocket covers. 7. Adjust the right sprocket to remove any slack in the paper; then lock it in place. 8. Attach the paper guide in its flat position over the printer. Slide the edge guides to the center. 9. Turn on the printer. When the printer receives data, it loads the paper automatically before printing. Note: You can also advance the paper to the loading position by pressing the LOAD/EJECT button. CAUTION: Use the knob on the left side of the printer only to clear paper jams when the printer is off. Otherwise you may damage the printer or lose the topof-form position. Removing continuous paper from the rear push-tractor 1. To remove continuous paper, press the TEAR OFF button to feed the paper's perforation to the tear-off edge of the printer cover. Note: If the page perforation does not meet the tear-off edge, you can adjust the tear-off position using the micro-feed feature. See Chapter 3. 2. Tear off the paper. 3. Press the LOAD/EJECT button to feed the continuous paper backward out of the printer and into the standby position. CAUTION: Make sure you tear off your printed document before pressing the LOAD/EJECT button. Reverse-feeding several pages at a time may cause a uauer iam. Paper Handling 2-17
-
 1
1 -
2
-
3
-
4
-
5
-
6
-
7
-
8
-
9
-
10
-
11
-
12
-
13
-
14
-
15
-
16
-
17
-
18
-
19
-
20
-
21
-
22
-
23
-
24
-
25
-
26
-
27
-
28
-
29
-
30
-
31
-
32
-
33
-
34
-
35
-
36
-
37
-
38
-
39
-
 40
40 -
 41
41 -
 42
42 -
 43
43 -
 44
44 -
 45
45 -
 46
46 -
 47
47 -
 48
48 -
 49
49 -
 50
50 -
51
-
52
-
53
-
54
-
55
-
56
-
57
-
58
-
59
-
60
-
61
-
62
-
63
-
64
-
65
-
66
-
67
-
68
-
69
-
70
-
71
-
72
-
73
-
74
-
75
-
76
-
77
-
78
-
79
-
80
-
81
-
82
-
83
-
84
-
85
-
86
-
87
-
88
-
89
-
90
-
91
-
92
-
93
-
94
-
95
-
96
-
97
-
98
-
99
-
100
-
101
-
102
-
103
-
104
-
105
-
106
-
107
-
108
-
109
-
110
-
111
-
112
-
113
-
114
-
115
-
116
-
117
-
118
-
119
-
120
-
121
-
122
-
123
-
124
-
125
-
126
-
127
-
128
-
129
-
130
-
131
-
132
-
133
-
134
-
135
-
136
-
137
-
138
-
139
-
140
-
141
-
142
-
143
-
144
-
145
-
146
-
147
-
148
-
149
-
150
-
151
-
152
-
153
-
154
-
155
-
156
-
157
-
158
-
159
 |
 |
