Epson LQ-850 User Manual - Page 135
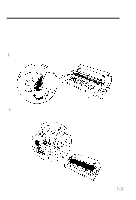
Installation and use, levers and lifting up the front of the unit at the same time.
 |
View all Epson LQ-850 manuals
Add to My Manuals
Save this manual to your list of manuals |
Page 135 highlights
The Pull Tractor Installation and use After making sure that the printer is turned off, install and use the pull tractor as follows: 1. Remove the printer cover and the paper guide and install the paper rest if you haven't already. (See page 2-7.) 2. Remove the paper tension unit by pressing open the release levers and lifting up the front of the unit at the same time. 3. Hold the pull tractor with the gears to the right and fit the rear notches on the tractor over the rear mounting pins on the printer as shown below. 7-17
-
 1
1 -
2
-
3
-
4
-
5
-
6
-
7
-
8
-
9
-
10
-
11
-
12
-
13
-
14
-
15
-
16
-
17
-
18
-
19
-
20
-
21
-
22
-
23
-
24
-
25
-
26
-
27
-
28
-
29
-
30
-
31
-
32
-
33
-
34
-
35
-
36
-
37
-
38
-
39
-
40
-
41
-
42
-
43
-
44
-
45
-
46
-
47
-
48
-
49
-
50
-
51
-
52
-
53
-
54
-
55
-
56
-
57
-
58
-
59
-
60
-
61
-
62
-
63
-
64
-
65
-
66
-
67
-
68
-
69
-
70
-
71
-
72
-
73
-
74
-
75
-
76
-
77
-
78
-
79
-
80
-
81
-
82
-
83
-
84
-
85
-
86
-
87
-
88
-
89
-
90
-
91
-
92
-
93
-
94
-
95
-
96
-
97
-
98
-
99
-
100
-
101
-
102
-
103
-
104
-
105
-
106
-
107
-
108
-
109
-
110
-
111
-
112
-
113
-
114
-
115
-
116
-
117
-
118
-
119
-
120
-
121
-
122
-
123
-
124
-
125
-
126
-
127
-
128
-
129
-
 130
130 -
 131
131 -
 132
132 -
 133
133 -
 134
134 -
 135
135 -
 136
136 -
 137
137 -
 138
138 -
 139
139 -
 140
140 -
141
-
142
-
143
-
144
-
145
-
146
-
147
-
148
-
149
-
150
-
151
-
152
-
153
-
154
-
155
-
156
-
157
-
158
-
159
-
160
-
161
-
162
-
163
-
164
-
165
-
166
-
167
-
168
-
169
-
170
-
171
-
172
-
173
-
174
-
175
-
176
-
177
-
178
-
179
-
180
-
181
-
182
-
183
-
184
-
185
-
186
-
187
-
188
-
189
-
190
-
191
-
192
-
193
-
194
-
195
-
196
-
197
-
198
-
199
-
200
-
201
-
202
-
203
-
204
-
205
-
206
-
207
-
208
-
209
-
210
-
211
-
212
-
213
-
214
-
215
-
216
-
217
-
218
-
219
-
220
-
221
-
222
 |
 |

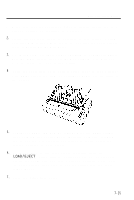
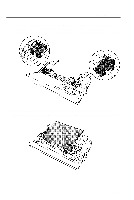
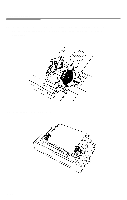
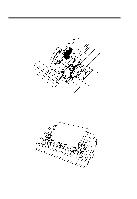
The Pull Tractor
Installation and use
After making sure that the printer is turned off, install and use
the pull tractor as follows:
1.
Remove the printer cover and the paper guide and install the
paper rest if you haven’t already. (See page 2-7.)
2.
3.
Remove the paper tension unit by pressing open the release
levers and lifting up the front of the unit at the same time.
Hold the pull tractor with the gears to the right and fit the rear
notches on the tractor over the rear mounting pins on the
printer as shown below.
7-17