Epson P20000 User Manual - Page 67
Take Up with the Printable Side In, Related references, Auto Cut, Use Take-up Unit
 |
View all Epson P20000 manuals
Add to My Manuals
Save this manual to your list of manuals |
Page 67 highlights
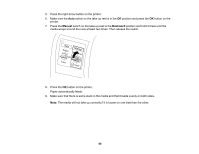
Related references Setup Menu Settings Take Up with the Printable Side In After you attach the roll core on the optional auto take-up reel, follow these steps to take up media with the printable side in. Note: Make sure Auto Cut is set to Off when you use the auto take-up reel. 1. Press the load/remove paper button on the printer. 2. Select Use Take-up Unit and press the OK button. Paper automatically feeds until the edge of the roll media reaches the roll core. 3. Wind the edge of the media around the back of the roll core. 4. Tape the edge of the media to the center of the core, then tape the edge to the left and right ends. 67
-
 1
1 -
2
-
3
-
4
-
5
-
6
-
7
-
8
-
9
-
10
-
11
-
12
-
13
-
14
-
15
-
16
-
17
-
18
-
19
-
20
-
21
-
22
-
23
-
24
-
25
-
26
-
27
-
28
-
29
-
30
-
31
-
32
-
33
-
34
-
35
-
36
-
37
-
38
-
39
-
40
-
41
-
42
-
43
-
44
-
45
-
46
-
47
-
48
-
49
-
50
-
51
-
52
-
53
-
54
-
55
-
56
-
57
-
58
-
59
-
60
-
61
-
 62
62 -
 63
63 -
 64
64 -
 65
65 -
 66
66 -
 67
67 -
 68
68 -
 69
69 -
 70
70 -
 71
71 -
 72
72 -
73
-
74
-
75
-
76
-
77
-
78
-
79
-
80
-
81
-
82
-
83
-
84
-
85
-
86
-
87
-
88
-
89
-
90
-
91
-
92
-
93
-
94
-
95
-
96
-
97
-
98
-
99
-
100
-
101
-
102
-
103
-
104
-
105
-
106
-
107
-
108
-
109
-
110
-
111
-
112
-
113
-
114
-
115
-
116
-
117
-
118
-
119
-
120
-
121
-
122
-
123
-
124
-
125
-
126
-
127
-
128
-
129
-
130
-
131
-
132
-
133
-
134
-
135
-
136
-
137
-
138
-
139
-
140
-
141
-
142
-
143
-
144
-
145
-
146
-
147
-
148
-
149
-
150
-
151
-
152
-
153
-
154
-
155
-
156
-
157
-
158
-
159
-
160
-
161
-
162
-
163
-
164
-
165
-
166
-
167
-
168
-
169
-
170
-
171
-
172
-
173
-
174
-
175
-
176
-
177
-
178
-
179
-
180
-
181
-
182
-
183
-
184
-
185
-
186
-
187
-
188
-
189
-
190
-
191
-
192
-
193
-
194
-
195
-
196
-
197
-
198
-
199
-
200
-
201
-
202
-
203
-
204
-
205
-
206
-
207
-
208
-
209
-
210
-
211
-
212
-
213
-
214
-
215
-
216
-
217
-
218
-
219
-
220
-
221
-
222
-
223
-
224
-
225
-
226
-
227
-
228
-
229
 |
 |

67
Related references
Setup Menu Settings
Take Up with the Printable Side In
After you attach the roll core on the optional auto take-up reel, follow these steps to take up media with
the printable side in.
Note:
Make sure
Auto Cut
is set to
Off
when you use the auto take-up reel.
1.
Press the
load/remove paper button on the printer.
2.
Select
Use Take-up Unit
and press the
OK
button.
Paper automatically feeds until the edge of the roll media reaches the roll core.
3.
Wind the edge of the media around the back of the roll core.
4.
Tape the edge of the media to the center of the core, then tape the edge to the left and right ends.