Epson P5000 Product Information Guide - Page 14
Copying Files to the USB Device, Resetting the Viewer - software
 |
UPC - 010343860483
View all Epson P5000 manuals
Add to My Manuals
Save this manual to your list of manuals |
Page 14 highlights
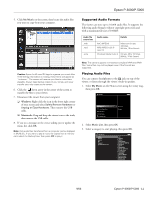
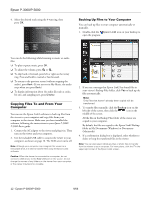
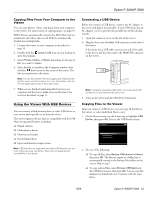
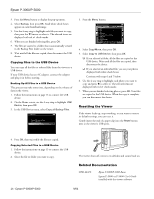
Epson P-3000/P-5000 3. Press the Menu button to display the pop-up menu. 4. Select Backup, then press OK. Small white check boxes appear on each thumbnail image. 5. Use the 4-way ring to highlight each file you want to copy, then press the button to select it. The selected items are displayed with red check marks. 6. When you are finished selecting files, press OK. 7. The files are copied to a folder that is automatically created in the Backup Files folder on the viewer. 8. Wait until all the files are copied, then disconnect the USB device. Copying Files to the USB Device You can copy all the files or selected files from the viewer to a USB device. If your USB device has an AC adapter, connect the adapter and plug it in before starting. Backing Up All Files to a USB Device This process may take some time, depending on the volume of data in the viewer. 1. Follow the instructions on page 13 to connect the USB device. 2. On the Home screen, use the 4-way ring to highlight USB Device, then press OK. 3. In the USB Device menu, select Copy all Backup Files. USB Device Backup USB device to Viewer Browse USB Device Copy all Backup Files 3. Press the Menu button. My Photos/2006.1205 Copy/Move Edit Rate EPV2014.JPG Sort EPV2171.JPG EPV2242.JPG Photo Print Wallpaper and Icon Settings Slide Show EPV2273.JPG EPV2279.JPG Settings EPV2283.JPG Return to HOME Delete EPV0013.TXT EPV2619.JPG EPV2620.JPG EPV2269.JPG EPV2314.JPG Down the Black Beaches EPV0480.MP3 4. Select Copy/Move, then press OK. 5. Select Copy to USB Device, then press OK. ❏ If you selected a folder, all the files are copied to the USB device. Wait until all the files are copied, then disconnect the device. ❏ If you selected an individual file, you see your photos displayed with white check boxes. Continue with steps 6 and 7 below. 6. Use the 4-way ring to highlight each photo you want to copy and press to select it. The selected items are displayed with red check marks. 7. When you are finished selecting photos, press OK. Your files are copied to the USB device. When the copy is complete, you can disconnect the device. Resetting the Viewer If the viewer locks up, stops working, or you want to restore its default settings, you can reset it. Gently insert the end of a paper clip into the Reset button next to the viewer's USB ports. 4. Press OK, then wait while the files are copied. Copying Selected Files to a USB Device 1. Follow the instructions on page 13 to connect the USB device. 2. Select the file or folder you want to copy. The viewer shuts off, resets to its defaults and comes back on. Related Documentation CPD-22470 Epson P-3000/P-5000 Basics Epson P-3000 or P-5000 User's Guide installed with the viewer software 14 - Epson P-3000/P-5000 9/06
-
 1
1 -
2
-
3
-
4
-
5
-
6
-
7
-
8
-
 9
9 -
 10
10 -
 11
11 -
 12
12 -
 13
13 -
 14
14
 |
 |
