Epson PP-100II Product Information Guide - Page 4
Loading Discs, Standard mode, External output mode, Batch mode, Loading Ink
 |
View all Epson PP-100II manuals
Add to My Manuals
Save this manual to your list of manuals |
Page 4 highlights
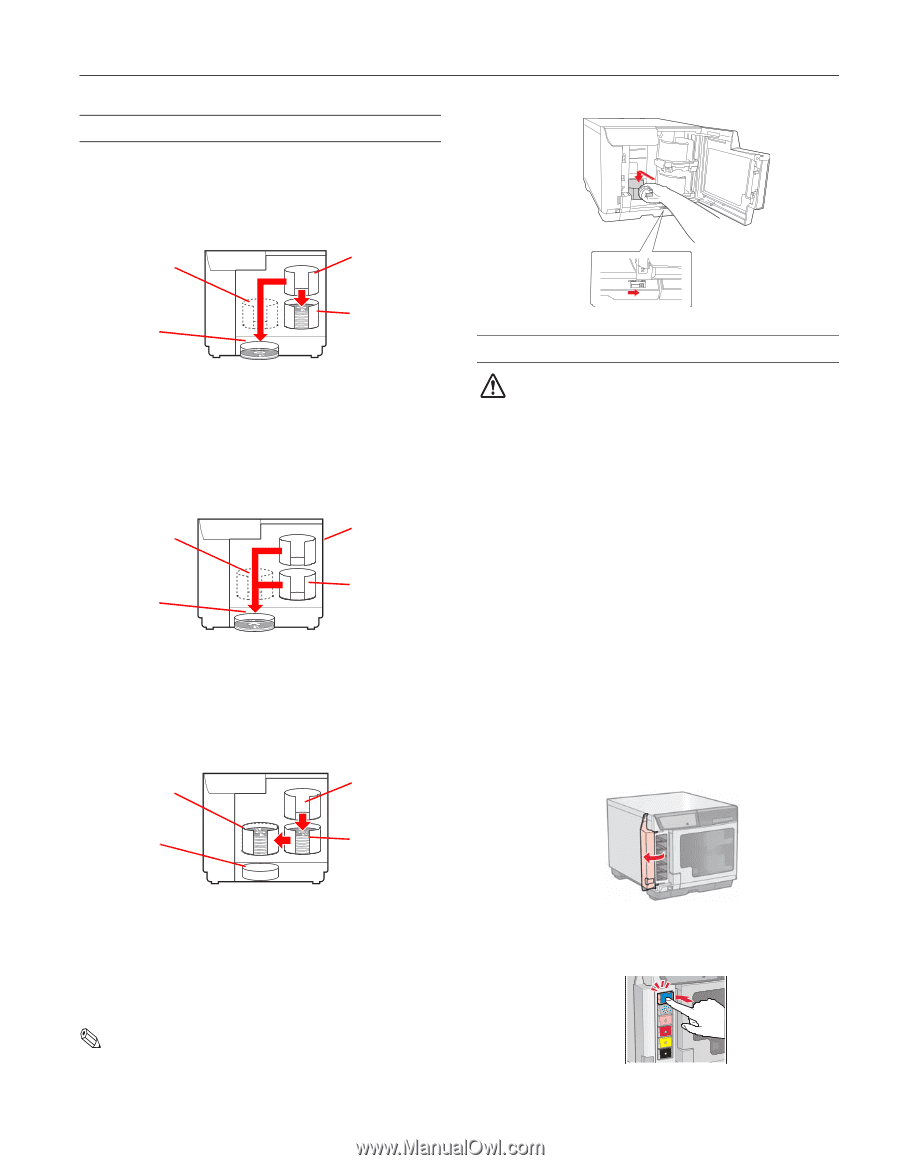
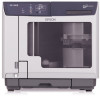
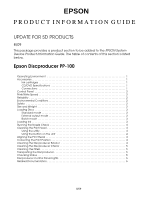
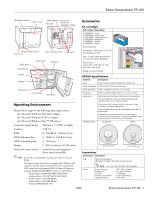
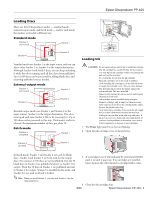
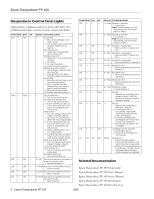
Epson Discproducer PP-100 Loading Discs There are three Discproducer modes - standard mode, external output mode, and batch mode - and for each mode, the stackers are loaded a different way. Standard mode Stacker 3 (removed) Stacker 1 Stacker 4 Stacker 2 Standard mode uses Stacker 1 as the input source, and you can select either Stacker 2 or Stacker 4 as the output destination. Although Stacker 4 only holds 5 discs, you can keep unloading it while the job is running until all discs have been published. Up to 1000 discs can be processed by adding blank discs and removing published ones as needed. External output mode Stacker 3 (removed) Stacker 1 Stacker 4 Stacker 2 External output mode uses Stacker 1 and Stacker 2 as the input sources. Stacker 4 is the output destination. The job is interruped each time Stacker 4 fills to let you empty it. Up to 100 discs can be processed in this way. If automatic stacker is selected, the maximum number of discs per job is 50. Batch mode Stacker 3 (installed) Stacker 1 Loading Ink CAUTION: Do not open package until ready to install ink cartridge. The ink cartridge has a green IC chip. Do not touch it. Use only Epson ink cartridges. Others may damage the unit and void the warranty. To avoid leaks, do not drop the ink cartridge. Keep ink cartridges out of the reach of children. After installing ink cartridge(s), do not shut off power or reopen ink cartridge cover. This can cause damage. The first time ink is loaded, the printer charges the system with ink. This uses more ink. Unnecessarily turning the unit on and off and frequent cleanings use ink faster. Ink cartridges remain installed during transport. Remove cartridges only if empty or when necessary. After removal, do not leave the cartridge holder empty, because the nozzles may clog. After removing a cartridge, do not touch the ink supply hole or orient it downward, because ink may leak. If ink gets on your skin, wash with soap and water. If ink gets in your eyes, flush with water immediately. If you have vision problems or discomfort, see a doctor. Follow regulations to dispose of used cartridges. 1. The Power light must be on, but not flashing. 2. Open the ink cartridge cover, as shown below. Stacker 4 (locked) Stacker 2 In Batch mode, Stacker 1 and Stacker 2 are used for blank discs. Stacker 2 and Stacker 3 are both used for the output discs. For instance, if 100 discs are to be published, first the 50 blank discs in Stacker 2 are published and sent to Stacker 3 for output. Then the 50 discs in Stacker 1 are published and sent to Stacker 2 for output. Stacker 3 is installed in this mode, and Stacker 4 is not used at all and is locked. 3. If a cartridge is out of ink (indicated by control panel LED), push it in until it pops out. If no cartridges are installed, insert them in the order shown by cartridge holder colors. Note: When you install Stacker 3, you must lock Stacker 4. See the illustration below. 4. Close the ink cartridge door. 8/09 Epson Discproducer PP-100 - 3
-
 1
1 -
 2
2 -
 3
3 -
 4
4 -
 5
5 -
 6
6 -
 7
7
 |
 |