Epson PP-100II Product Information Guide - Page 5
Running the Nozzle Check, Cleaning the Print Head, Using the utility, Using the button on the unit - adjustment program
 |
View all Epson PP-100II manuals
Add to My Manuals
Save this manual to your list of manuals |
Page 5 highlights
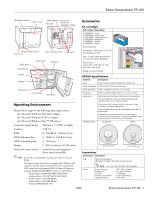
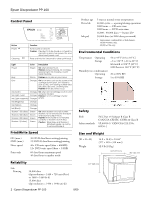
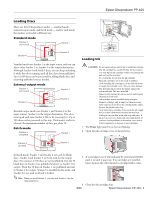
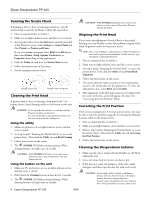
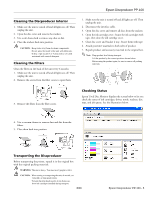
Epson Discproducer PP-100 Running the Nozzle Check If printing is faint or dots are missing in printout, run the nozzle check to identify problems. Follow the steps below. 1. Place an unprinted disc in Stacker 1. 2. Make sure no lights indicate errors and disc cover is closed. 3. Access printer driver from the Start menu in the bottom left of the Windows screen. Select Settings or Control Panel and then Printers or Printers and Faxes. If you are running a program, select Print from File menu; then select Printer, Setup, Options, Preferences, or Properties (depending on the application). 4. Click the Utility tab and then the Nozzle Check button. 5. Follow the instructions on the screen. 6. See the example printouts below. Nozzle check OK Nozzle check no good Cleaning the Print Head If print is faint or dots are missing, clean print head. Use printer driver's head cleaning utility or the button on the unit. CAUTION: Do not open the ink cartridge cover during cleaning. Frequent cleanings use ink faster. You may not be able to clean print head if ink is low. You must replace the ink cartridge first. Using the utility 1. Make sure printer is on, no lights indicate errors, and disc cover is closed. 2. See step 3 under "Running the Nozzle Check" to access the printer driver. Then click the Utility tab and Head Cleaning. 3. Follow instructions on the screen. 4. The POWER LED flashes during cleaning. When cleaning finishes, the light stays on steadily. CAUTION: While POWER LED flashes, never open covers, and never reset or turn off the printer. This may damage the unit. Using the button on the unit 1. Make sure PC and printer are on, no lights indicate errors, and disc cover is closed. 2. Hold down the Cleaning button on the unit for 3 seconds. 3. The POWER LED flashes during cleaning. When cleaning finishes, the light stays on steadily. CAUTION: While POWER LED flashes, never open covers, and never reset or turn off the printer. This may damage the printer. Aligning the Print Head If you notice misalignment of vertical lines or horizontal banding, you may be able to solve the problem using the Print Head Alignment utility in the printer driver. Note: Discs vary in thickness, and using discs of different thicknesses may result in print head misalignment. Use the same disc type throughout a single publishing job. 1. Place an unprinted disc in Stacker 1. 2. Make sure no lights indicate errors and disc cover is closed. 3. See step 3 under "Running the Nozzle Check" to access the printer driver. Then click the Utility tab and Print Head Alignment. 4. Follow the instructions on the screen. 5. The utility adds the value you enter in the confirmation screen to the initial value for the adjustment. To clear the adjustment value, select Reset and click Exit. 6. After alignment, if the label print surface is not aligned with the center of the disc, print will appear off center. See "Correcting the Print Position" below. Correcting the Print Position If you notice misalignment of vertical print position, you may be able to solve the problem using the Correcting the Printing Position utility in the printer driver. 1. Place an unprinted disc in Stacker 1. 2. Make sure no lights indicate errors and disc cover is closed. 3. Refer to step 3 under "Running the Nozzle Check" to access the printer driver. Then click the Utility tab and Correcting the Print Position. 4. Follow the instructions on the screen. Cleaning the Discproducer Exterior 1. Make sure the unit is turned off and all lights are off. Then unplug the unit. 2. Use a soft clean cloth to remove any dust or dirt. 3. If dirt does not come off, dampen a cloth with a mild detergent, and then wipe the unit dry with a soft cloth. CAUTION: Do not apply alcohol, benzene, paint thinner, toluene, or ketone-based solvents on the printer, because these may damage the plastic. Prevent water from getting in the case. Moisture, dirt, or foreign material can cause a short circuit. 4 - Epson Discproducer PP-100 8/09
-
 1
1 -
 2
2 -
 3
3 -
 4
4 -
 5
5 -
 6
6 -
 7
7
 |
 |
