Epson PhotoPC 850Z Product Information Guide - Page 11
Using the Camera for Presentations, Projecting the Presentation, Playing Back Pictures on TV - photo pc
 |
View all Epson PhotoPC 850Z manuals
Add to My Manuals
Save this manual to your list of manuals |
Page 11 highlights
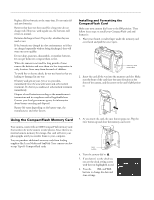
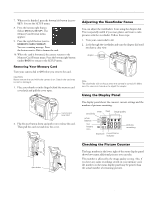
EPSON PhotoPC 850Z Using the Camera for Presentations You can connect your camera to a multimedia projector and show not just photos, but also text and graphics. The EPSON Photo File Uploader3 lets you transfer images from your computer to your camera's memory card. Anything you can display on your computer screen can be captured, converted, and uploaded. You can create and show a presentation without printing overhead transparencies or slides, and without a laptop computer. Projecting the Presentation You can display the uploaded images on a multimedia projector. Use the video cable that came with your EPSON PhotoPC 850Z. Note Using the optional AC adapter is highly recommended when you project your presentation. See page 14 for instructions and ordering information. Follow these steps: 1. Make sure your camera and video projector are turned off. 2. Open the camera's connector cover and connect the black end of the video cable to the Video Out port, as shown: Playing Back Pictures on TV You can display your pictures on a regular television or VCR by using the video cable that came with your PhotoPC 850Z. Tip You can videotape your pictures to share them without using a computer. After you connect the camera to your VCR, press the Record button on the VCR and use the camera's slide show feature. Follow these steps: 1. Make sure the camera and TV (and VCR) are turned off. 2. Open the camera's connector cover and connect the black end of the video cable to the Video Out port, as shown: 3. Connect the yellow end of the cable to the VIDEO IN port and the white end of the cable to the AUDIO IN port on the television or VCR. 4. Turn on the TV (and VCR) and switch to the correct video mode. 3. Connect the yellow end of the video cable to the VIDEO IN port and the white end of the cable to the AUDIO IN port on the projector. 4. Turn on the video projector and switch it to video mode. 5. Turn the camera dial to . The last image that you uploaded into the camera is projected. If you are using the optional AC adapter, you can also see the image on the LCD screen. You can use the camera's slide show feature to play your images automatically, or play them one at time using the navigation buttons. You can use all of the camera's other playback features to show your presentation. Getting Pictures into Your Computer When you're finished taking pictures, you can connect the camera to your computer and transfer the images. If you have the optional universal AC adapter, you can extend battery life by using it when you connect the camera to your computer. Connecting to a Windows PC You can connect the camera to your PC with either the Windows serial cable or the USB cable that came with the camera. You must have a USB-enabled Windows 98 system to use the USB cable. 8/99 EPSON PhotoPC 850Z - 11
-
 1
1 -
2
-
3
-
4
-
5
-
 6
6 -
 7
7 -
 8
8 -
 9
9 -
 10
10 -
 11
11 -
 12
12 -
 13
13 -
 14
14
 |
 |
