Epson PictureMate Zoom - PM 290 Basics - Page 5
Supported Photo Formats, Where to Find Information, Where to Get a Print Pack and Accessories - picturemate zoom pm
 |
View all Epson PictureMate Zoom - PM 290 manuals
Add to My Manuals
Save this manual to your list of manuals |
Page 5 highlights
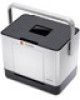
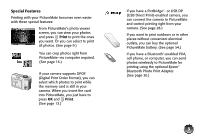
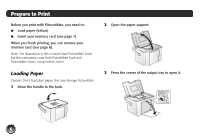
Supported Photo Formats Make sure your photos meet these requirements for printing with your PictureMate (without a computer): ● JPEG files or uncompressed TIFF files only ● Resolutions ranging from 80 × 80 to 9200 × 9200 pixels PictureMate recognizes and prints the first 999 photos on your memory card. Where to Find Information Your manuals cover both PictureMate Dash and Zoom. Start Here ® PictureMate DashTM (PM 260) PictureMate ZoomTM (PM 290) Follow these steps to set up your PictureMate Dash or Zoom and print -no computer required! Note: PictureMate Dash is shown throughout, but the steps are the same for PictureMate Zoom. To print from your computer, see the Basics book and your CD after completing these steps. 1 Unpack PictureMate® comes with all these items in the box. 2 Plug In and Turn On 1 Connect the power adapter to the back of PictureMate. 2 Connect the power cable to the power adapter. 3 Plug the other end of the power cable into a power outlet. 4 Flip the handle to the back. 5 Open the paper support. PictureMate Power adapter Power cable I/ On button PictureMate photo paper Initial PictureMate photo cartridge Basics book Printer Software CD 1 Remove all the tape and packing material from the outside of PictureMate. 2 Open the cartridge door on the back of PictureMate. 3 Remove the packing material from inside the cartridge slot. 4 Close the cartridge door. 6 Press the On button to turn on PictureMate. After a moment, you see this on the photo viewer screen: Now you can install your initial photo cartridge. 3 Install the Initial Photo Cartridge 1 Turn PictureMate around and open the cartridge door. 2 Slide the cartridge lever left to the Release position. 3 Remove the initial photo cartridge from its package. Caution: Do not install a different PictureMate cartridge for initial setup. Install only the initial photo cartridge that came with your PictureMate. 4 Slide the cartridge straight into the slot, label side up, until it clicks into place. It will not go in all the way. 5 Slide the lever all the way right, to the Lock position. 6 Close the cartridge door. PictureMate charges the print head for 3 to 4 minutes and displays the screen above. 7 When you see the Charging complete message on the photo viewer screen, press OK. *411058000* *411058000* Press here Turn over See your Start Here sheet to unpack, set up, and use your PictureMate. Basics (this book) explains how to print photos directly from your memory card, from your computer, and from other devices, replace the Print Pack, and solve problems. The on-screen User's Guide installed from the CD has detailed instructions for using PictureMate. 4 Where to Get a Print Pack and Accessories The PictureMate 200 Series Print Pack has everything you need to print in one box: photo paper and a photo cartridge. You can buy a Print Pack wherever PictureMate is sold or from retailers that sell printer supplies. The following Print Packs are available: Print Pack contents Glossy photo paper (150 sheets) and photo cartridge Matte photo paper (100 sheets) and photo cartridge Part number T5846 T5845-M Supported PictureMate models All PictureMate 200 Series models You can also buy a Print Pack and other PictureMate accessories from an Epson authorized reseller. To find the nearest reseller, call 800-GO-EPSON (800-463-7766). Or you can purchase online at www.epsonstore.com (U.S. sales) or www.epson.ca (Canadian sales).
-
 1
1 -
 2
2 -
 3
3 -
 4
4 -
 5
5 -
 6
6 -
 7
7 -
 8
8 -
 9
9 -
 10
10 -
 11
11 -
12
-
13
-
14
-
15
-
16
-
17
-
18
-
19
-
20
-
21
-
22
-
23
-
24
-
25
-
26
-
27
-
28
-
29
-
30
-
31
-
32
-
33
-
34
-
35
-
36
-
37
-
38
-
39
-
40
-
41
-
42
-
43
-
44
-
45
-
46
-
47
-
48
-
49
-
50
-
51
-
52
-
53
-
54
-
55
-
56
-
57
-
58
-
59
-
60
-
61
-
62
-
63
-
64
-
65
-
66
-
67
-
68
-
69
-
70
-
71
-
72
-
73
-
74
-
75
-
76
-
77
-
78
-
79
-
80
-
81
-
82
-
83
-
84
-
85
-
86
-
87
-
88
-
89
-
90
-
91
 |
 |
