Epson PowerLite 703c User Manual - Page 47
Adjusting Image Appearance, Sharpens or softens the image.
 |
View all Epson PowerLite 703c manuals
Add to My Manuals
Save this manual to your list of manuals |
Page 47 highlights
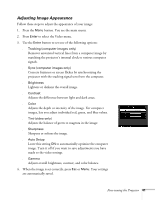
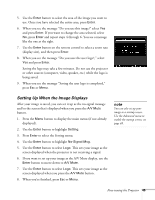
Adjusting Image Appearance Follow these steps to adjust the appearance of your image: 1. Press the Menu button. You see the main menu. 2. Press Enter to select the Video menu. 3. Use the Enter button to set one of the following options: s Tracking (computer images only) Removes unwanted vertical lines from a computer image by matching the projector's internal clock to various computer signals. s Sync (computer images only) Corrects fuzziness or screen flicker by synchronizing the projector with the tracking signal sent from the computer. s Brightness Lightens or darkens the overall image. s Contrast Adjusts the difference between light and dark areas. s Color Adjusts the depth or intensity of the image. For computer images, lets you adjust individual red, green, and blue values. s Tint (video only) Adjusts the balance of green to magenta in the image. s Sharpness Sharpens or softens the image. s Auto Setup Leave this setting ON to automatically optimize the computer image. Turn it off if you want to save adjustments you have made to the video settings. s Gamma Adjusts overall brightness, contrast, and color balance. 4. When the image is set correctly, press Esc or Menu. Your settings are automatically saved. Fine-tuning the Projector 41
-
 1
1 -
2
-
3
-
4
-
5
-
6
-
7
-
8
-
9
-
10
-
11
-
12
-
13
-
14
-
15
-
16
-
17
-
18
-
19
-
20
-
21
-
22
-
23
-
24
-
25
-
26
-
27
-
28
-
29
-
30
-
31
-
32
-
33
-
34
-
35
-
36
-
37
-
38
-
39
-
40
-
41
-
 42
42 -
 43
43 -
 44
44 -
 45
45 -
 46
46 -
 47
47 -
 48
48 -
 49
49 -
 50
50 -
 51
51 -
 52
52 -
53
-
54
-
55
-
56
-
57
-
58
-
59
-
60
-
61
-
62
-
63
-
64
-
65
-
66
-
67
-
68
-
69
-
70
-
71
-
72
-
73
-
74
-
75
-
76
-
77
-
78
-
79
-
80
-
81
-
82
-
83
-
84
-
85
-
86
-
87
-
88
-
89
-
90
-
91
-
92
-
93
-
94
-
95
-
96
-
97
-
98
-
99
-
100
-
101
-
102
-
103
 |
 |
