Epson PowerLite 8150NL Administrator's Manual - Page 26
Making Other Computer Connections, Connecting to a Second Computer
 |
View all Epson PowerLite 8150NL manuals
Add to My Manuals
Save this manual to your list of manuals |
Page 26 highlights
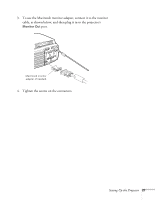
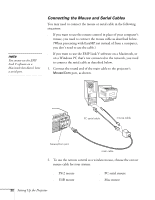
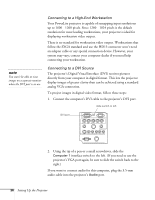
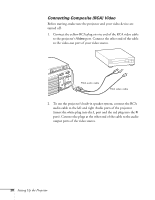
Making Other Computer Connections If you want to connect a second computer, a high-end workstation, or a Digital Visual Interface (DVI) source, follow the instructions below. Connecting to a Second Computer Follow these steps to connect a computer to the Computer 2/ Component Video interface. (Use the VGA-to-5BNC cable as shown.) Note that you won't be able to use the BNC connectors for a video device when a computer is connected to them. 1. Connect the VGA end of the cable to your computer's video port. 2. Connect the five connectors at the other end of the cable to the projector's R (red), G (green), B (blue), H/C Sync (horizontal sync), and V Sync (vertical sync) ports, as shown below. audio connectors Computer 1 Computer 2 /Component Video R/Cr/Pr G/Y B/Cb/Pb H/C Sync V Sync Remote Mouse/Com Audio S-Video S-Audio/Audio2 Video L-Audio-R Monitor Out Stack Out BNC connectors 3. To display images properly, make sure the BNC parameter in the projector's Setting menu is set to RGB. See page 79. 4. If you want to hear computer-audio through the projector, you'll need an RCA-to-3.5 mm stereo cable (available for purchase from your electronics store or video dealer). Insert the cable's 3.5-mm plug into your computer's audio-out port. Then attach the RCA connectors at the other end of the cable to the S-Audio and Audio2 ports of the projector. Setting Up the Projector 25
-
 1
1 -
2
-
3
-
4
-
5
-
6
-
7
-
8
-
9
-
10
-
11
-
12
-
13
-
14
-
15
-
16
-
17
-
18
-
19
-
20
-
 21
21 -
 22
22 -
 23
23 -
 24
24 -
 25
25 -
 26
26 -
 27
27 -
 28
28 -
 29
29 -
 30
30 -
 31
31 -
32
-
33
-
34
-
35
-
36
-
37
-
38
-
39
-
40
-
41
-
42
-
43
-
44
-
45
-
46
-
47
-
48
-
49
-
50
-
51
-
52
-
53
-
54
-
55
-
56
-
57
-
58
-
59
-
60
-
61
-
62
-
63
-
64
-
65
-
66
-
67
-
68
-
69
-
70
-
71
-
72
-
73
-
74
-
75
-
76
-
77
-
78
-
79
-
80
-
81
-
82
-
83
-
84
-
85
-
86
-
87
-
88
-
89
-
90
-
91
-
92
-
93
-
94
-
95
-
96
-
97
-
98
-
99
-
100
-
101
-
102
-
103
-
104
-
105
-
106
-
107
-
108
-
109
-
110
-
111
-
112
-
113
-
114
-
115
-
116
-
117
-
118
-
119
-
120
-
121
-
122
-
123
-
124
-
125
-
126
-
127
-
128
-
129
-
130
-
131
-
132
-
133
-
134
-
135
 |
 |
