Epson PowerLite W16SK User's Guide - Page 35
Connecting to a Computer for HDMI Video and Audio, Connecting to Computer Sources
 |
View all Epson PowerLite W16SK manuals
Add to My Manuals
Save this manual to your list of manuals |
Page 35 highlights
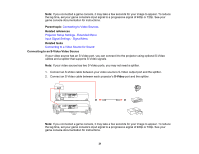
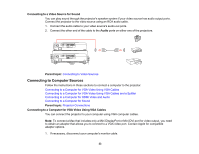
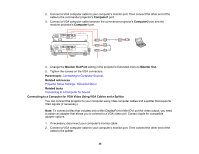
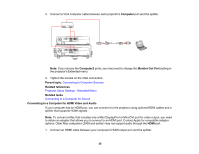
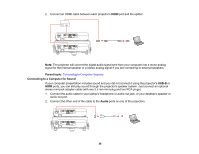
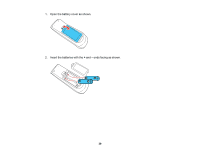
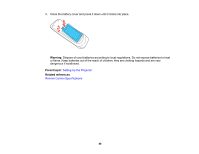
3. Connect a VGA computer cable between each projector's Computer port and the splitter. Note: If you choose the Computer2 ports, you may need to change the Monitor Out Port setting in the projector's Extended menu. 4. Tighten the screws on the VGA connectors. Parent topic: Connecting to Computer Sources Related references Projector Setup Settings - Extended Menu Related tasks Connecting to a Computer for Sound Connecting to a Computer for HDMI Video and Audio If your computer has an HDMI port, you can connect it to the projector using optional HDMI cables and a splitter that supports HDMI signals. Note: To connect a Mac that includes only a Mini DisplayPort or Mini-DVI port for video output, you need to obtain an adapter that allows you to connect to an HDMI port. Contact Apple for compatible adapter options. Older Mac computers (2009 and earlier) may not support audio through the HDMI port. 1. Connect an HDMI cable between your computer's HDMI output port and the splitter. 35
-
 1
1 -
2
-
3
-
4
-
5
-
6
-
7
-
8
-
9
-
10
-
11
-
12
-
13
-
14
-
15
-
16
-
17
-
18
-
19
-
20
-
21
-
22
-
23
-
24
-
25
-
26
-
27
-
28
-
29
-
 30
30 -
 31
31 -
 32
32 -
 33
33 -
 34
34 -
 35
35 -
 36
36 -
 37
37 -
 38
38 -
 39
39 -
 40
40 -
41
-
42
-
43
-
44
-
45
-
46
-
47
-
48
-
49
-
50
-
51
-
52
-
53
-
54
-
55
-
56
-
57
-
58
-
59
-
60
-
61
-
62
-
63
-
64
-
65
-
66
-
67
-
68
-
69
-
70
-
71
-
72
-
73
-
74
-
75
-
76
-
77
-
78
-
79
-
80
-
81
-
82
-
83
-
84
-
85
-
86
-
87
-
88
-
89
-
90
-
91
-
92
-
93
-
94
-
95
-
96
-
97
-
98
-
99
-
100
-
101
-
102
-
103
-
104
-
105
-
106
-
107
-
108
-
109
-
110
-
111
-
112
-
113
-
114
-
115
-
116
-
117
-
118
-
119
-
120
-
121
-
122
-
123
-
124
-
125
-
126
-
127
-
128
-
129
-
130
-
131
-
132
-
133
-
134
-
135
-
136
-
137
-
138
-
139
-
140
-
141
-
142
-
143
-
144
-
145
-
146
-
147
-
148
-
149
-
150
-
151
-
152
-
153
-
154
-
155
-
156
-
157
-
158
-
159
-
160
-
161
-
162
-
163
-
164
-
165
-
166
-
167
-
168
-
169
-
170
-
171
-
172
-
173
-
174
-
175
-
176
-
177
-
178
-
179
 |
 |
