Epson S041885 Creating a Photo Book - Page 29
Epson Printers: Printing Your Final s
 |
UPC - 010343853652
View all Epson S041885 manuals
Add to My Manuals
Save this manual to your list of manuals |
Page 29 highlights
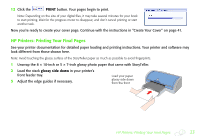
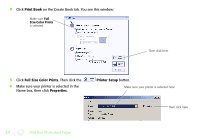
Epson Printers: Printing Your Final Pages 1 Unwrap the 8 × 10-inch or 5 × 7-inch glossy photo paper that came with StoryTeller. Note: Avoid touching the glossy surface of the StoryTeller paper as much as possible to avoid fingerprints. 2 Load the stack glossy side up against the right side of your printer's feeder. Left edge guide Load the paper against the right side of your feeder Lower the output tray and slide out any extensions 3 Slide the left edge guide up against the paper, but not too tightly. 4 Lower the output tray and pull out the output tray extensions, if your printer has them. Epson Printers: Printing Your Final Pages 29
-
 1
1 -
2
-
3
-
4
-
5
-
6
-
7
-
8
-
9
-
10
-
11
-
12
-
13
-
14
-
15
-
16
-
17
-
18
-
19
-
20
-
21
-
22
-
23
-
 24
24 -
 25
25 -
 26
26 -
 27
27 -
 28
28 -
 29
29 -
 30
30 -
 31
31 -
 32
32 -
 33
33 -
 34
34 -
35
-
36
-
37
-
38
-
39
-
40
-
41
-
42
-
43
-
44
-
45
-
46
-
47
-
48
-
49
-
50
-
51
-
52
-
53
-
54
-
55
-
56
-
57
-
58
-
59
-
60
-
61
-
62
-
63
-
64
-
65
-
66
-
67
-
68
-
69
-
70
-
71
-
72
-
73
-
74
-
75
-
76
-
77
-
78
-
79
-
80
-
81
-
82
-
83
-
84
-
85
-
86
-
87
-
88
-
89
-
90
-
91
-
92
-
93
-
94
-
95
-
96
-
97
-
98
 |
 |

Epson Printers: Printing Your Final Pages
29
Epson Printers: Printing Your Final Pages
1
Unwrap the 8 × 10-inch or 5 × 7-inch glossy photo paper that came with StoryTeller.
Note: Avoid touching the glossy surface of the StoryTeller paper as much as possible to avoid fingerprints.
2
Load the stack
glossy side up
against the right side of your printer’s feeder.
3
Slide the left edge guide up against the paper, but not too tightly.
4
Lower the output tray and pull out the output tray extensions, if your printer has them.
Load the paper against
the right side of your
feeder
Lower the output tray
and slide out any
extensions
Left edge guide