Epson S041885 Creating a Photo Book - Page 88
Repeat these steps with the other flap., Press down on the flap's crease so that it stays in place.
 |
UPC - 010343853652
View all Epson S041885 manuals
Add to My Manuals
Save this manual to your list of manuals |
Page 88 highlights
2 Position the photo book on the open cover page and fold the first flap over one side of the book. Fold the flap over one side of the book Press down on the flap's crease so that it stays in place 3 Press down on the flap's crease so that it stays in place. Note: Optionally, you can secure the flap to the book with one of the adhesive strips that came with the book. 4 Repeat these steps with the other flap. 88 Assemble Your Photo Book
-
 1
1 -
2
-
3
-
4
-
5
-
6
-
7
-
8
-
9
-
10
-
11
-
12
-
13
-
14
-
15
-
16
-
17
-
18
-
19
-
20
-
21
-
22
-
23
-
24
-
25
-
26
-
27
-
28
-
29
-
30
-
31
-
32
-
33
-
34
-
35
-
36
-
37
-
38
-
39
-
40
-
41
-
42
-
43
-
44
-
45
-
46
-
47
-
48
-
49
-
50
-
51
-
52
-
53
-
54
-
55
-
56
-
57
-
58
-
59
-
60
-
61
-
62
-
63
-
64
-
65
-
66
-
67
-
68
-
69
-
70
-
71
-
72
-
73
-
74
-
75
-
76
-
77
-
78
-
79
-
80
-
81
-
82
-
 83
83 -
 84
84 -
 85
85 -
 86
86 -
 87
87 -
 88
88 -
 89
89 -
 90
90 -
 91
91 -
 92
92 -
 93
93 -
94
-
95
-
96
-
97
-
98
 |
 |

88
Assemble Your Photo Book
2
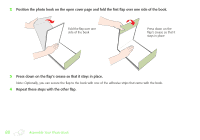
Position the photo book on the open cover page and fold the first flap over one side of the book.
3
Press down on the flap’s crease so that it stays in place.
Note: Optionally, you can secure the flap to the book with one of the adhesive strips that came with the book.
4
Repeat these steps with the other flap.
Fold the flap over one
side of the book
Press down on the
flap’s crease so that it
stays in place