Epson Stylus C86 Start Here Card - Page 3
Connect the Printer - installation software
 |
View all Epson Stylus C86 manuals
Add to My Manuals
Save this manual to your list of manuals |
Page 3 highlights
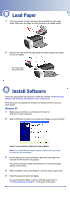
6 Close the printer cover, then press the ink button. The green power light flashes as your printer charges ink for a few minutes. Caution: Don't turn off the printer while the green power light is flashing, unless the printer hasn't moved or made noise for more than 5 minutes. 4 Connect the Printer Printer cables are not included with your printer. You need only one of the following cables: • USB cable (Windows® or Macintosh®) or • Parallel cable (Windows only). Note: If you have Windows NT ® 4.x, you must use a parallel cable. USB Cable Users (Windows or Mac®) 1 Make sure your computer is turned off. Keep it turned off until section 6, "Install Software." 2 Plug the square end of the cable into the USB port on the back of the printer. 3 Plug the flat end of the cable into your computer's USB port until it stops. (You can use any open USB port.) Flat end Square end Parallel Cable Users (Windows only) 1 Make sure your computer is turned off. Keep it turned off until section 6, "Install Software." 2 Plug the end of the cable with the slotted connector into the parallel port on the side of the printer, then secure it with the wire clips. 3 Plug the end of the cable with the screws on the side into your computer's parallel port and secure it. End with screws Slotted end
-
 1
1 -
 2
2 -
 3
3 -
 4
4 -
 5
5 -
 6
6 -
 7
7 -
 8
8
 |
 |
