Epson Stylus C86 Start Here Card - Page 5
Windows 98 and Me - install
 |
View all Epson Stylus C86 manuals
Add to My Manuals
Save this manual to your list of manuals |
Page 5 highlights
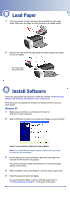
Windows 98 and Me 1 Make sure your printer is connected and turned on. Then turn on your computer. 2 Wait for Windows to detect your printer and display a screen like this: DON'T CLICK ANY BUTTONS ON THIS SCREEN. Note: If a screen like this doesn't appear, make sure your printer is turned on and connected. 3 Put the Epson CD in your CD-ROM or DVD drive and wait a few seconds for the CD to be recognized. 4 Click Next on the Add New Hardware Wizard Screen. (In Windows Me, you may not need to click Next.) 98 If you're using Windows 98, continue with step 5. Me If you're using Windows Me, go to step 9. 5 When you see this screen, click the Search for option, then click Next. 6 When you see this screen, click CD-ROM drive. Make sure Specify a location is not checked, then click Next. 7 At the next screen, click Next. Installation proceeds automatically. 8 When installation halts, click Finish. Your computer detects your printer again. 9 Do one of the following: 98 Click Next on each of the four screens that follow. Me Click Next on the next screen. When the Add Printer Wizard screen appears, click Finish. 10 When installation halts, click Finish. You see the license agreement. 11 Read the agreement and click Agree. Continue with the instructions in "Finishing Windows Installation" in the next column.
-
 1
1 -
 2
2 -
 3
3 -
 4
4 -
 5
5 -
 6
6 -
 7
7 -
 8
8
 |
 |
