Epson Stylus Photo R3000 Basics - Page 20
Printing From Start to Finish, Printing in Windows - software
 |
View all Epson Stylus Photo R3000 manuals
Add to My Manuals
Save this manual to your list of manuals |
Page 20 highlights
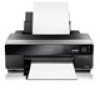
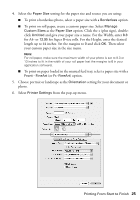
Printing From Start to Finish This section describes basic printing from your Windows® or Macintosh® computer. For detailed instructions, see the online User's Guide. You can also print label designs directly onto ink jet-printable CDs or DVDs. See page 30 and the online User's Guide for details. To print photos directly from a PictBridge®-compatible digital camera connected to the R3000 Series, see the online User's Guide. Tip: It's a good idea to check for updates to your Epson Stylus Photo R3000 Series software. See "Checking for Software Updates" on page 57 for instructions. Printing in Windows 1. Open a photo or document in a printing program, and select the print option. Select your Epson product Click here to open your printer software 2. Select your product, then click the Preferences or Properties button. Note: If you see a Setup, Printer, or Options button, click it. Then click Preferences or Properties on the next screen. 20 Printing From Start to Finish
-
 1
1 -
2
-
3
-
4
-
5
-
6
-
7
-
8
-
9
-
10
-
11
-
12
-
13
-
14
-
 15
15 -
 16
16 -
 17
17 -
 18
18 -
 19
19 -
 20
20 -
 21
21 -
 22
22 -
 23
23 -
 24
24 -
 25
25 -
26
-
27
-
28
-
29
-
30
-
31
-
32
-
33
-
34
-
35
-
36
-
37
-
38
-
39
-
40
-
41
-
42
-
43
-
44
-
45
-
46
-
47
-
48
-
49
-
50
-
51
-
52
-
53
-
54
-
55
-
56
-
57
-
58
-
59
-
60
-
61
-
62
-
63
-
64
-
65
-
66
-
67
-
68
 |
 |
