Epson Stylus Photo R300M Start Here Card - Page 4
Install Software, Load Paper - drivers
 |
View all Epson Stylus Photo R300M manuals
Add to My Manuals
Save this manual to your list of manuals |
Page 4 highlights
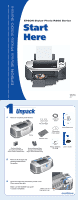
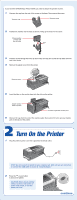
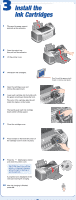
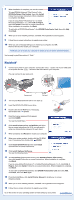
4 Load Paper 1 Fan a few sheets of paper and load them against the right side of the sheet feeder. 2 Slide the left edge guide against the paper. NOTE: For instructions on loading and printing on CDs or DVDs, see your User's Guide. 5 Install Software Windows® Make sure your printer is NOT connected to your computer, then follow the steps below. 1 Turn on your computer. Wait for the system to start up, then insert the EPSON® CD-ROM in your drive. NOTE: If you see a screen like this, click Cancel and disconnect the printer from your computer. 2 Read the license agreement that appears and click Agree. 3 You see a message like this: Click OK to begin installing your printer driver. 4 When you see this screen, connect the square end of your USB cable to the back of the printer and the flat end of the USB cable to your computer. (You can connect to any open port.) NOTE: For Windows XP, if you don't have USB 2.0, you see a message. Click the Close button to close the message. Square end Wait while Windows detects your hardware. 5 When you see this screen, click Continue. 6 Follow the on-screen instructions to install your software. Flat end continue
-
 1
1 -
 2
2 -
 3
3 -
 4
4 -
 5
5 -
 6
6
 |
 |
