Epson Stylus Photo R300M Start Here Card - Page 5
continue - driver
 |
View all Epson Stylus Photo R300M manuals
Add to My Manuals
Save this manual to your list of manuals |
Page 5 highlights
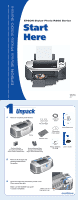
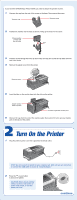
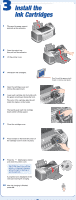
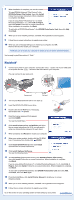
7 When installation is complete, you see this screen: To install EPSON SoftwareTM Film Factory,TM click EPSON Software Film Factory, then click Install. Follow the on-screen instructions. When installation is complete, click Back. If you're using Adobe® Photoshop® 6, 7 or Adobe Photoshop Elements 1 or 2, click P.I.M. II Plug-In, then click Install. Follow the on-screen instructions. When installation is complete, click Back. To add a link to EPSON PhotoCenter,SM click EPSON PhotoCenter Link, then click Add. Click Back. 8 When you're done installing software, click Exit. The registration screen appears. 9 Follow the on-screen instructions to register your printer. 10 When you see a message telling you to restart your computer, click OK. Remove the CD, then restart your computer. NOTE: Be sure to restart your computer to enable all of your printer software features. You're ready to print! See section 6, "Print." Macintosh® 1 Connect your printer to your computer: connect the square end of your USB cable to the printer and the flat end of the USB cable to your computer. (You can connect to any open port.) Square end Flat end 2 Turn on your Macintosh and wait for it to start up. 3 Insert the EPSON CD-ROM in your drive. 4 Double-click the CD-ROM icon, if necessary, then double-click EPSON. 5 Read the license agreement that appears and click AGREE. You see the Install Menu. 6 Click Install Printer Driver and Utilities and follow the on-screen instructions. (In OS X, you will need to enter your Administrator password for each item.) 7 When prompted, click Restart to restart your computer. 8 When your system restarts, double-click the CD-ROM icon, if necessary, then double-click EPSON. 9 Click Install EPSON Print CD, then click Install and follow the on-screen instructions. 10 Click Install Optional Software. You see the following menu: 11 To install EPSON Software Film Factory, click EPSON Software Film Factory, then click Install. Follow the on-screen instructions. When installation is complete, click Back. If you're using Adobe Photoshop 6, 7 or Adobe Photoshop Elements 1 or 2, click P.I.M. II Plug-In, then click Install. Follow the on-screen instructions. When installation is complete, click Back. To add a link to EPSON PhotoCenter, click EPSON PhotoCenter Link, then click Add. Click Back, then click Back again. 12 From the Install Menu, click Install Printer Manual to install your on-screen Reference Guide. 13 When you're done installing software, click Exit. The registration screen appears. 14 Follow the on-screen instructions to register your printer. continue Go to the section for your operating system to finish setting up your printer.
-
 1
1 -
 2
2 -
 3
3 -
 4
4 -
 5
5 -
 6
6
 |
 |
