Epson Stylus Photo RX600 Product Information Guide - Page 10
Selecting One or More Photos to Print, Selecting a Range of Photos, Using DPOF to Select Your Photos - all in one printer
 |
View all Epson Stylus Photo RX600 manuals
Add to My Manuals
Save this manual to your list of manuals |
Page 10 highlights
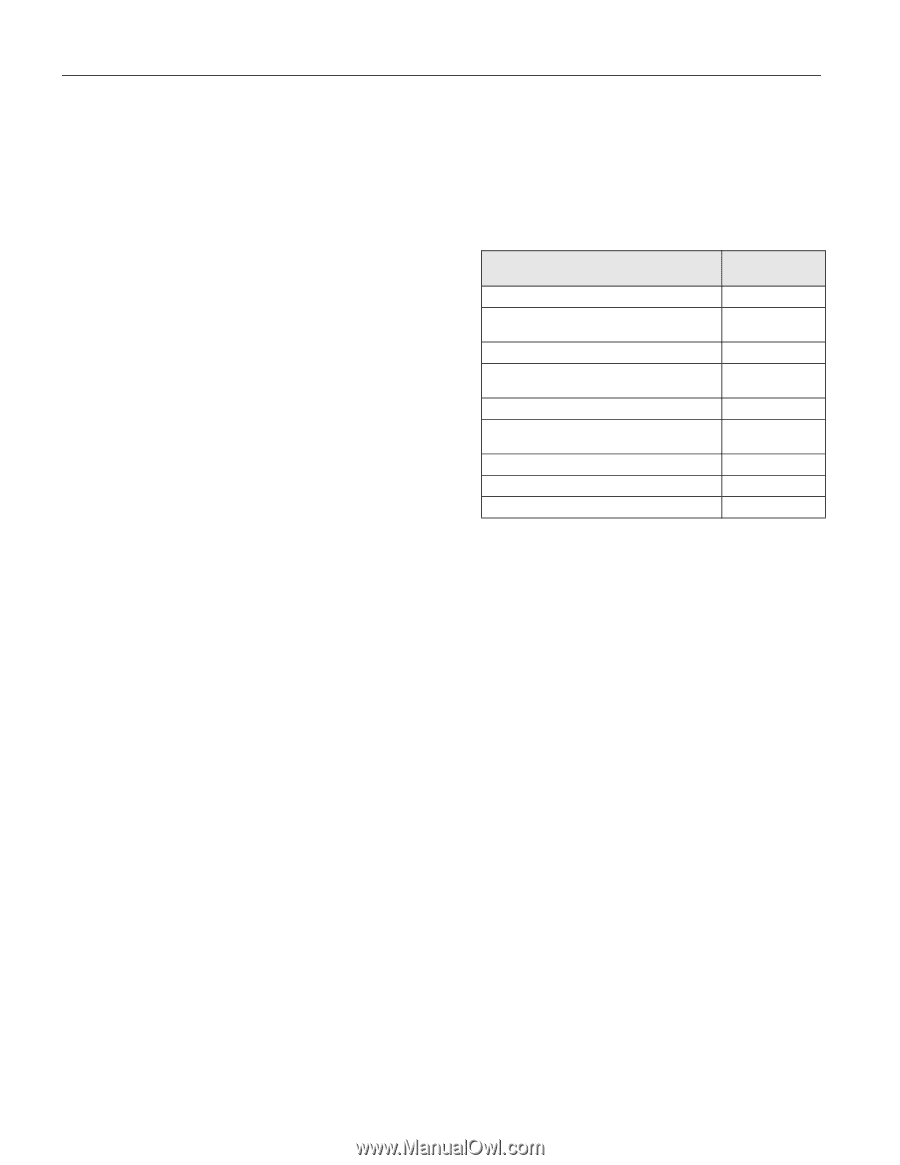
Epson Stylus Photo RX600 Selecting One or More Photos to Print Follow these steps to print a single photo or selected photos on a memory card: 1. Press the Memory Card button. 2. Use the u and d buttons to highlight Custom Print. 3. Use the l and r buttons to choose Select Print, then press the OK button. 4. To print one or a few photos, use the l and r buttons to navigate to the first photo you want to print, then use the u and d buttons to choose the number of copies you want to print. Do this for each photo you want to print, then press the OK button. To print all the photos on the card, select All Print and press the OK button. 5. Continue with "Printing the Selected Photos" on page 10 to finish laying out your photos and setting up your print job. Selecting a Range of Photos You can select a range of photos to print (such as photos 1 through 5) and print them as a group. 1. Press the Memory Card button. 2. Use the u and d buttons to highlight Custom Print. 3. Use the l and r buttons to choose Range Print, then press the OK button. 4. Use the l and r buttons to choose the first photo in the range, then press the OK button. 5. Use the l and r buttons to choose the last photo in the range, then press the OK button. 6. Continue with "Printing the Selected Photos" below to finish laying out your photos and setting up your print job. Using DPOF to Select Your Photos If your camera supports DPOF (Digital Print Order Format), you can use it to select photos for printing before you insert the card in your printer. See your camera's instruction manual for details. 1. Press the Memory Card button. 2. Use the u and d buttons to highlight Custom Print. 3. Use the l and r buttons to choose DPOF, then press the OK button. 4. Continue with the next section to finish laying out your photos and setting up your print job. Printing the Selected Photos 1. Press the u and d buttons to highlight Paper Type, then press the l and r buttons to choose the type of paper that is loaded in the printer. Refer to the following table. (These are the settings you should choose when you're not using your computer to print.) Loaded paper type Plain paper Epson Photo Paper Epson Glossy Photo Paper Epson Premium Glossy Photo Paper Epson Premium Semigloss Photo Paper Epson Semigloss Scrapbook Photo Paper Epson Premium Luster Photo Paper Epson Matte Paper Heavyweight PremierArt Matte Scrapbook Photo Paper Epson ColorLife Photo Paper Epson Iron-On Transfer Paper Epson Glossy Photo Greeting Cards Paper Type setting Plain GlossyPhoto Prem.Glossy Semigloss Prem.Luster Matte ColorLife Iron-on Greeting 2. Press the u and d buttons to highlight Paper Size, then use the l and r buttons to select the size of paper you've loaded. 3. Use the u and d buttons to highlight Layout, then use the l and r buttons to select the desired layout option (such as BorderFree, 2-up, etc.). 4. Use the u and d buttons to highlight Resolution, then use the l and r buttons to choose Normal, Photo, or Best Photo. 5. If you like, you can make further changes before printing. Use the u and d buttons to choose one of the options listed (such as Brightness, Fit to Frame, etc.). Then use the l and r buttons to select the desired setting. 6. When you're done adjusting print settings, press the OK button. 7. If you want to print multiple sets of your entire print job, press the u and d buttons to choose the number of sets to print (1 to 99). 8. Press the x Color button or x B&W button to begin printing. Note: To cancel a print job while printing, press the y Stop button. 10 - Epson Stylus Photo RX600 2/04
-
 1
1 -
2
-
3
-
4
-
 5
5 -
 6
6 -
 7
7 -
 8
8 -
 9
9 -
 10
10 -
 11
11 -
 12
12 -
 13
13 -
 14
14 -
 15
15 -
16
-
17
-
18
 |
 |