Epson Stylus Photo RX600 Product Information Guide - Page 12
Scanning From a Program, Scanning With the Scan Button, Placing Film or Slides on the Scanner - user manual
 |
View all Epson Stylus Photo RX600 manuals
Add to My Manuals
Save this manual to your list of manuals |
Page 12 highlights
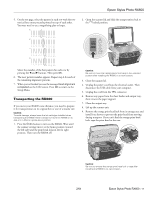
Epson Stylus Photo RX600 You see the File Save Settings window: 5. For Windows, if you see the screen below on your computer, select EPSON Scan and click the Always use this program for this action checkbox. Then click OK. Type a name for your file here Select a file format here 4. Type a name for your file in the Prefix box. 5. Select a file format in the Type box. 6. Click OK. Epson Scan starts and scans your file to the location you specified. Note: Never open the scanner lid while scanning, or your scans may not look right. Scanning From a Program You can scan from any TWAIN-compliant program-such as Adobe Photoshop or ArcSoft PhotoImpression-using Epson Scan. Epson Scan provides three scanning modes for progressive levels of control over your scanned image: ❏ Full Auto Mode makes scanning quick and easy, with automatic image type and resolution settings. ❏ Home Mode provides a simple screen giving you automatic image adjustments, previewing and cropping capability, and preset configurations for various types of scans. ❏ Professional Mode lets you manually configure advanced image settings. See the User's Guide for more information. Scanning With the Scan Button 1. Place your document face-down on the glass as shown on page 6, and make sure your computer and RX600 are on. 2. Close the scanner lid. 3. Press the Scan button to set the RX600 to Scan mode. 4. Use the u and d buttons to choose Scan to PC, then press the OK button. Note: You can also scan to a memory card or to an e-mail; see the User's Guide for instructions. Select this option Then check this box 6. When you see the File Save Settings window, type a name for your file in the Prefix box, select a file format in the Type box, and click OK. 7. Complete the scan using Epson Scan. Placing Film or Slides on the Scanner You can copy, scan, and print from 35 mm film strips and slides. Follow the instructions below to: ❏ Remove the film holder and document mat ❏ Load 35 mm film strips in the film holder ❏ Place 35 mm slides on the film holder Removing the Film Holder and Document Mat 1. Open the scanner lid and slide out the document mat. Set the mat aside so you can reinstall it for scanning reflective documents later. Note: You can't scan film or slides unless the white document mat is removed from the scanner lid. 12 - Epson Stylus Photo RX600 2/04
-
 1
1 -
2
-
3
-
4
-
5
-
6
-
 7
7 -
 8
8 -
 9
9 -
 10
10 -
 11
11 -
 12
12 -
 13
13 -
 14
14 -
 15
15 -
 16
16 -
 17
17 -
18
 |
 |
