Epson Stylus Pro 4000 Professional Edition Service Manual - Page 156
Outline
 |
View all Epson Stylus Pro 4000 Professional Edition manuals
Add to My Manuals
Save this manual to your list of manuals |
Page 156 highlights
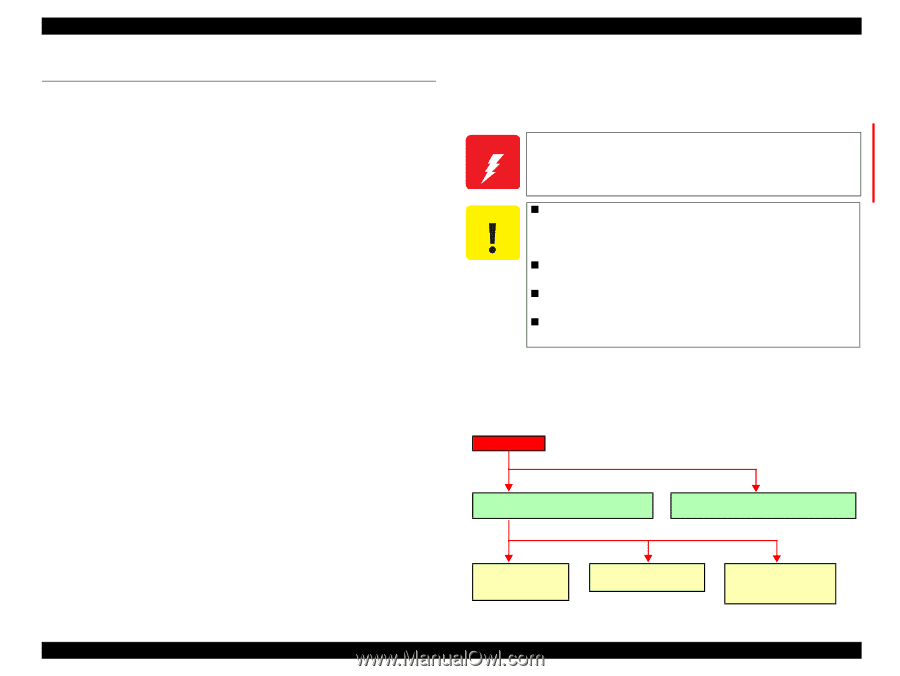
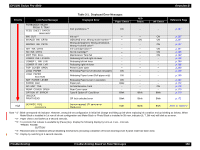
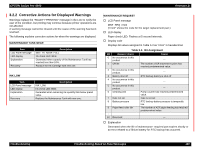
EPSON Stylus Pro 4000 Revision B 3.1 Outline This section explains procedures for rapid and efficient troubleshooting if trouble occurs in the printer. 3.1.1 Check Before Troubleshooting First of all, when performing troubleshooting, the following basic parts should be checked. 1. Look in the printer for any foreign matter and make sure there is nothing there to hinder normal operation. 2. With the printer in "READY" condition, press the [Menu] key one time, and then press the [Paper Feed keys to select "TEST PRINT". Press the [Menu] key again one time, press the [Paper Feed keys to select "STATUS CHECK". After these have been selected, press the [Menu] key two times to print. From the status sheet, you can check to see if the cause of the trouble is that the printer (either the printer unit itself or some major unit) is at the end of its service life, and check the user inherent panel settings, etc. (Refer to "Step 9" when in properties panel settings.) 3. There should be no market soiling of the outside or the inside of the printer. If it is extremely soiled, carry out cleaning. 4. Each of the units and parts in the printer should not be missing or damaged, and should have the normal shape and configuration. 5. Each of the harnesses should be undamaged, and should be correctly connected to the relevant connector (perpendicularly and in the correct direction). 6. Each cam and gear in the printer mechanism should have no uneven wear or be overly worn, and the combinations should be correct. 7. Each type of rubber roller in the printer mechanism should be cleaned and it should be ascertained whether the cause of the trouble is because of dirt or due to some other cause. 8. Each type of rubber roller in the printer mechanism should not be unevenly worn or excessively worn, and their combinations should be correct. 9. As necessary, initialize the NVRAM on the C511 MAIN Board (return the individual customer settings and panel settings to the factory settings). Carry out initialization by executing "NVRAM" from the "CLEAR COUNTERS" in "Maintenance Mode 2". W A R N IN G Be sure to refer to "4.1.1 Cautions" (p197) for the detailed description when handling a lithium battery that is installed for RTC backup on the MAIN Board. C A U T IO N „ When disassembling/assembling, turn the printer power switch OFF. After confirming that panel display disappears, unplug the power cable from the electric outlet and then continue operations. „ Only the specified printer tools should be used so as to maintain the printer's quality. „ Only the specified lubricants and adhesives should be used. „ The specified adjustments should definitely be carried out. 3.1.2 Narrow Down the Trouble To increase the troubleshooting efficiency, follow the flow chart below and narrow down the trouble. Trouble Occurs "Troubleshooting Based on Panel Messages (p157)" "Troubleshooting Based on Your Printout (p192) " "Corrective Actions for Displayed Warnings (p160) " "Corrective Actions for Error Display (p163)" "Corrective Actions for Service Request Display (p172) " Troubleshooting Outline 156
-
 1
1 -
2
-
3
-
4
-
5
-
6
-
7
-
8
-
9
-
10
-
11
-
12
-
13
-
14
-
15
-
16
-
17
-
18
-
19
-
20
-
21
-
22
-
23
-
24
-
25
-
26
-
27
-
28
-
29
-
30
-
31
-
32
-
33
-
34
-
35
-
36
-
37
-
38
-
39
-
40
-
41
-
42
-
43
-
44
-
45
-
46
-
47
-
48
-
49
-
50
-
51
-
52
-
53
-
54
-
55
-
56
-
57
-
58
-
59
-
60
-
61
-
62
-
63
-
64
-
65
-
66
-
67
-
68
-
69
-
70
-
71
-
72
-
73
-
74
-
75
-
76
-
77
-
78
-
79
-
80
-
81
-
82
-
83
-
84
-
85
-
86
-
87
-
88
-
89
-
90
-
91
-
92
-
93
-
94
-
95
-
96
-
97
-
98
-
99
-
100
-
101
-
102
-
103
-
104
-
105
-
106
-
107
-
108
-
109
-
110
-
111
-
112
-
113
-
114
-
115
-
116
-
117
-
118
-
119
-
120
-
121
-
122
-
123
-
124
-
125
-
126
-
127
-
128
-
129
-
130
-
131
-
132
-
133
-
134
-
135
-
136
-
137
-
138
-
139
-
140
-
141
-
142
-
143
-
144
-
145
-
146
-
147
-
148
-
149
-
150
-
 151
151 -
 152
152 -
 153
153 -
 154
154 -
 155
155 -
 156
156 -
 157
157 -
 158
158 -
 159
159 -
 160
160 -
 161
161 -
162
-
163
-
164
-
165
-
166
-
167
-
168
-
169
-
170
-
171
-
172
-
173
-
174
-
175
-
176
-
177
-
178
-
179
-
180
-
181
-
182
-
183
-
184
-
185
-
186
-
187
-
188
-
189
-
190
-
191
-
192
-
193
-
194
-
195
-
196
-
197
-
198
-
199
-
200
-
201
-
202
-
203
-
204
-
205
-
206
-
207
-
208
-
209
-
210
-
211
-
212
-
213
-
214
-
215
-
216
-
217
-
218
-
219
-
220
-
221
-
222
-
223
-
224
-
225
-
226
-
227
-
228
-
229
-
230
-
231
-
232
-
233
-
234
-
235
-
236
-
237
-
238
-
239
-
240
-
241
-
242
-
243
-
244
-
245
-
246
-
247
-
248
-
249
-
250
-
251
-
252
-
253
-
254
-
255
-
256
-
257
-
258
-
259
-
260
-
261
-
262
-
263
-
264
-
265
-
266
-
267
-
268
-
269
-
270
-
271
-
272
-
273
-
274
-
275
-
276
-
277
-
278
-
279
-
280
-
281
-
282
-
283
-
284
-
285
-
286
-
287
-
288
-
289
-
290
-
291
-
292
-
293
-
294
-
295
-
296
-
297
-
298
-
299
-
300
-
301
-
302
-
303
-
304
-
305
-
306
-
307
-
308
-
309
-
310
-
311
-
312
-
313
-
314
-
315
-
316
-
317
-
318
-
319
-
320
-
321
-
322
-
323
-
324
-
325
-
326
-
327
-
328
-
329
-
330
-
331
-
332
-
333
-
334
-
335
-
336
-
337
-
338
-
339
-
340
-
341
-
342
-
343
-
344
-
345
-
346
-
347
-
348
-
349
-
350
-
351
-
352
-
353
-
354
-
355
-
356
-
357
-
358
-
359
-
360
-
361
-
362
-
363
-
364
-
365
-
366
-
367
-
368
-
369
-
370
-
371
-
372
-
373
-
374
-
375
-
376
-
377
-
378
-
379
-
380
-
381
-
382
-
383
-
384
-
385
-
386
-
387
-
388
-
389
-
390
-
391
-
392
-
393
-
394
-
395
-
396
-
397
-
398
-
399
-
400
-
401
-
402
-
403
-
404
-
405
-
406
-
407
-
408
-
409
-
410
-
411
-
412
-
413
-
414
-
415
-
416
-
417
-
418
-
419
-
420
-
421
-
422
-
423
-
424
-
425
-
426
-
427
-
428
-
429
-
430
-
431
-
432
-
433
-
434
-
435
-
436
-
437
-
438
-
439
-
440
-
441
-
442
-
443
-
444
-
445
-
446
-
447
-
448
-
449
-
450
-
451
-
452
-
453
-
454
-
455
-
456
-
457
-
458
-
459
-
460
-
461
-
462
-
463
-
464
 |
 |