Epson Stylus Pro 4000 Professional Edition Service Manual - Page 362

Adjustment Program Basic Operation
Page 362 highlights

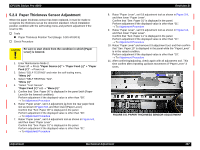
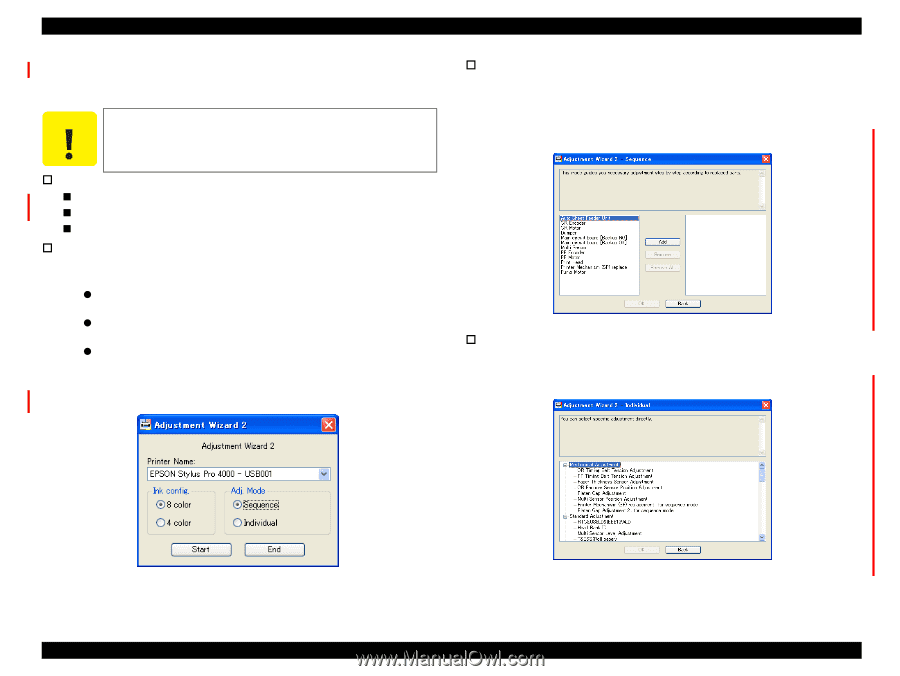
EPSON Stylus Pro 4000 5.1.7 Adjustment Program Basic Operation This section describes basic methods for operating the adjustment program. C A U T IO N The adjustment program includes adjustment items to be used other than on-site. Regarding on-site repairs, do not execute adjustments other than those described in this manual. † Operating Environment „ OS: Widows 98, Me, 2000, XP „ Port: USB port „ Printer driver and ESM3 have to be installed. † Start-up 1. Double-click [adjwiz2.exe] to start the adjustment program. 2. Select the following items after the startup screen appears. z Printer name Stylus Pro 4000 z Ink Config. Select the ink type currently installed. z Adju. Mode Select whether to execute adjustments with the sequential mode (Sequence) or to execute each adjustment individually (Individual). 3. Click [Start]. Revision B † Sequential Mode This is a guide mode for executing the required adjustments in a set order when a replaced part or unit is selected. 1. Select the replaced part or unit from the left column and click [Add]. 2. Click the [OK] button. Figure 5-2. Sequential Mode Screen † Individual Adjustment Mode This is a mode for executing each adjustment item individually. 1. Select the adjustment item to be executed and click the [OK] button. Figure 5-1. Adjustment Program Startup Screen Figure 5-3. Individual Adjustment Mode Screen Adjustment Overview 362
  • 1
  • 2
  • 3
  • 4
  • 5
  • 6
  • 7
  • 8
  • 9
  • 10
  • 11
  • 12
  • 13
  • 14
  • 15
  • 16
  • 17
  • 18
  • 19
  • 20
  • 21
  • 22
  • 23
  • 24
  • 25
  • 26
  • 27
  • 28
  • 29
  • 30
  • 31
  • 32
  • 33
  • 34
  • 35
  • 36
  • 37
  • 38
  • 39
  • 40
  • 41
  • 42
  • 43
  • 44
  • 45
  • 46
  • 47
  • 48
  • 49
  • 50
  • 51
  • 52
  • 53
  • 54
  • 55
  • 56
  • 57
  • 58
  • 59
  • 60
  • 61
  • 62
  • 63
  • 64
  • 65
  • 66
  • 67
  • 68
  • 69
  • 70
  • 71
  • 72
  • 73
  • 74
  • 75
  • 76
  • 77
  • 78
  • 79
  • 80
  • 81
  • 82
  • 83
  • 84
  • 85
  • 86
  • 87
  • 88
  • 89
  • 90
  • 91
  • 92
  • 93
  • 94
  • 95
  • 96
  • 97
  • 98
  • 99
  • 100
  • 101
  • 102
  • 103
  • 104
  • 105
  • 106
  • 107
  • 108
  • 109
  • 110
  • 111
  • 112
  • 113
  • 114
  • 115
  • 116
  • 117
  • 118
  • 119
  • 120
  • 121
  • 122
  • 123
  • 124
  • 125
  • 126
  • 127
  • 128
  • 129
  • 130
  • 131
  • 132
  • 133
  • 134
  • 135
  • 136
  • 137
  • 138
  • 139
  • 140
  • 141
  • 142
  • 143
  • 144
  • 145
  • 146
  • 147
  • 148
  • 149
  • 150
  • 151
  • 152
  • 153
  • 154
  • 155
  • 156
  • 157
  • 158
  • 159
  • 160
  • 161
  • 162
  • 163
  • 164
  • 165
  • 166
  • 167
  • 168
  • 169
  • 170
  • 171
  • 172
  • 173
  • 174
  • 175
  • 176
  • 177
  • 178
  • 179
  • 180
  • 181
  • 182
  • 183
  • 184
  • 185
  • 186
  • 187
  • 188
  • 189
  • 190
  • 191
  • 192
  • 193
  • 194
  • 195
  • 196
  • 197
  • 198
  • 199
  • 200
  • 201
  • 202
  • 203
  • 204
  • 205
  • 206
  • 207
  • 208
  • 209
  • 210
  • 211
  • 212
  • 213
  • 214
  • 215
  • 216
  • 217
  • 218
  • 219
  • 220
  • 221
  • 222
  • 223
  • 224
  • 225
  • 226
  • 227
  • 228
  • 229
  • 230
  • 231
  • 232
  • 233
  • 234
  • 235
  • 236
  • 237
  • 238
  • 239
  • 240
  • 241
  • 242
  • 243
  • 244
  • 245
  • 246
  • 247
  • 248
  • 249
  • 250
  • 251
  • 252
  • 253
  • 254
  • 255
  • 256
  • 257
  • 258
  • 259
  • 260
  • 261
  • 262
  • 263
  • 264
  • 265
  • 266
  • 267
  • 268
  • 269
  • 270
  • 271
  • 272
  • 273
  • 274
  • 275
  • 276
  • 277
  • 278
  • 279
  • 280
  • 281
  • 282
  • 283
  • 284
  • 285
  • 286
  • 287
  • 288
  • 289
  • 290
  • 291
  • 292
  • 293
  • 294
  • 295
  • 296
  • 297
  • 298
  • 299
  • 300
  • 301
  • 302
  • 303
  • 304
  • 305
  • 306
  • 307
  • 308
  • 309
  • 310
  • 311
  • 312
  • 313
  • 314
  • 315
  • 316
  • 317
  • 318
  • 319
  • 320
  • 321
  • 322
  • 323
  • 324
  • 325
  • 326
  • 327
  • 328
  • 329
  • 330
  • 331
  • 332
  • 333
  • 334
  • 335
  • 336
  • 337
  • 338
  • 339
  • 340
  • 341
  • 342
  • 343
  • 344
  • 345
  • 346
  • 347
  • 348
  • 349
  • 350
  • 351
  • 352
  • 353
  • 354
  • 355
  • 356
  • 357
  • 358
  • 359
  • 360
  • 361
  • 362
  • 363
  • 364
  • 365
  • 366
  • 367
  • 368
  • 369
  • 370
  • 371
  • 372
  • 373
  • 374
  • 375
  • 376
  • 377
  • 378
  • 379
  • 380
  • 381
  • 382
  • 383
  • 384
  • 385
  • 386
  • 387
  • 388
  • 389
  • 390
  • 391
  • 392
  • 393
  • 394
  • 395
  • 396
  • 397
  • 398
  • 399
  • 400
  • 401
  • 402
  • 403
  • 404
  • 405
  • 406
  • 407
  • 408
  • 409
  • 410
  • 411
  • 412
  • 413
  • 414
  • 415
  • 416
  • 417
  • 418
  • 419
  • 420
  • 421
  • 422
  • 423
  • 424
  • 425
  • 426
  • 427
  • 428
  • 429
  • 430
  • 431
  • 432
  • 433
  • 434
  • 435
  • 436
  • 437
  • 438
  • 439
  • 440
  • 441
  • 442
  • 443
  • 444
  • 445
  • 446
  • 447
  • 448
  • 449
  • 450
  • 451
  • 452
  • 453
  • 454
  • 455
  • 456
  • 457
  • 458
  • 459
  • 460
  • 461
  • 462
  • 463
  • 464

EPSON Stylus Pro 4000
Revision B
Adjustment
Overview
362
5.1.7
Adjustment Program Basic Operation
This section describes basic methods for operating the adjustment program.
Operating Environment
OS:
Widows 98, Me, 2000, XP
Port:
USB port
Printer driver and ESM3 have to be installed.
Start-up
1.
Double-click [adjwiz2.exe] to start the adjustment program.
2.
Select the following items after the startup screen appears.
Printer name
Stylus Pro 4000
Ink Config.
Select the ink type currently installed.
Adju. Mode
Select whether to execute adjustments with the sequential mode
(Sequence) or to execute each adjustment individually (Individual).
3.
Click [Start].
Figure 5-1. Adjustment Program Startup Screen
Sequential Mode
This is a guide mode for executing the required adjustments in a set order
when a replaced part or unit is selected.
1.
Select the replaced part or unit from the left column and click [Add].
2.
Click the [OK] button.
Figure 5-2. Sequential Mode Screen
Individual Adjustment Mode
This is a mode for executing each adjustment item individually.
1.
Select the adjustment item to be executed and click the [OK] button.
Figure 5-3. Individual Adjustment Mode Screen
C
A
U
T
I
O
N
The adjustment program includes adjustment items to be
used other than on-site. Regarding on-site repairs, do not
execute adjustments other than those described in this
manual.