Epson Stylus Pro 4800 Portrait Edition Getting Started - ColorBurst RIP - Page 6
Windows Clients Printing to a Windows RIP Server
 |
View all Epson Stylus Pro 4800 Portrait Edition manuals
Add to My Manuals
Save this manual to your list of manuals |
Page 6 highlights
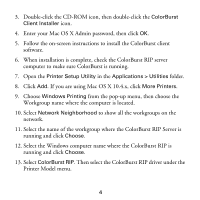
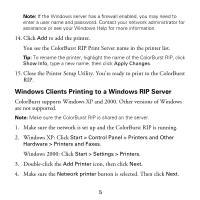
Note: If the Windows server has a firewall enabled, you may need to enter a user name and password. Contact your network administrator for assistance or see your Windows Help for more information. 14. Click Add to add the printer. You see the ColorBurst RIP Print Server name in the printer list. Tip: To rename the printer, highlight the name of the ColorBurst RIP, click Show Info, type a new name, then click Apply Changes. 15. Close the Printer Setup Utility. You're ready to print to the ColorBurst RIP. Windows Clients Printing to a Windows RIP Server ColorBurst supports Windows XP and 2000. Other versions of Windows are not supported. Note: Make sure the ColorBurst RIP is shared on the server. 1. Make sure the network is set up and the ColorBurst RIP is running. 2. Windows XP: Click Start > Control Panel > Printers and Other Hardware > Printers and Faxes. Windows 2000: Click Start > Settings > Printers. 3. Double-click the Add Printer icon, then click Next. 4. Make sure the Network printer button is selected. Then click Next. 5
-
 1
1 -
 2
2 -
 3
3 -
 4
4 -
 5
5 -
 6
6 -
 7
7 -
 8
8 -
 9
9 -
 10
10
 |
 |