Epson Stylus Pro 9000 Product Information Guide - Page 13
Setting Up the Printer After Transporting It, Moving the Printer on the Stand - ink cartridge
 |
View all Epson Stylus Pro 9000 manuals
Add to My Manuals
Save this manual to your list of manuals |
Page 13 highlights
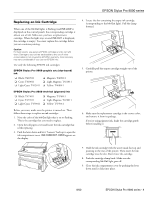
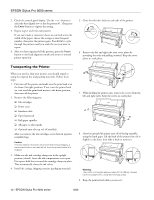
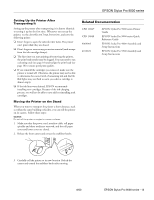
EPSON Stylus Pro 9000 series Setting Up the Printer After Transporting It Setting up the printer after transporting it is almost identical to setting it up for the first time. Whenever you set up the printer, see the Assembly and Setup Instructions, and note the following points: ❏ Don't forget to open the side ink valve locks. The printer can't print while they are closed. ❏ Don't forget to remove any protective material (such as tape from the ink cartridge clamps). ❏ The first time you start printing after moving the printer, the print head nozzles may be clogged. You may need to run a cleaning cycle (see page 10) and realign the print head (see page 10) to ensure good print quality. ❏ If you reinstall the cartridges you removed, make sure the printer is turned off. Otherwise, the printer may not be able to determine the correct level of remaining ink and the Ink Out lights may not flash to warn you when a cartridge is almost empty. ❏ If the ink lines were drained, EPSON recommends installing new cartridges. Because of the ink charging process, you will not be able to save ink by reinstalling used cartridges. Moving the Printer on the Stand When you want to transport the printer a short distance, such as within the same building or facility, you can roll the printer on its casters. Follow these steps: Caution: Do not roll the printer on angled or uneven surfaces. 1. Make sure that the power cord, interface cable, roll paper spindles and sheet media are removed, and the roll paper cover and lower cover are closed. 2. Release the front casters and retract the stabilizer knobs. Related Documentation CPD 10847 CPD 10848 4009903 4012670 EPSON Stylus Pro 9000 series Printer Guide EPSON Stylus Pro 9000 series Quick Reference Guide EPSON Stylus Pro 9000 Assembly and Setup Instructions EPSON Stylus Pro 9500 Assembly and Setup Instructions 3. Carefully roll the printer to its new location. Relock the casters and extend the stabilizer knobs after moving. 8/00 EPSON Stylus Pro 9000 series - 13
-
 1
1 -
2
-
3
-
4
-
5
-
6
-
7
-
 8
8 -
 9
9 -
 10
10 -
 11
11 -
 12
12 -
 13
13 -
 14
14
 |
 |
