Epson Stylus Pro 9000 Product Information Guide - Page 9
Replacing an Ink Cartridge, EPSON Stylus Pro 9000 series - 9
 |
View all Epson Stylus Pro 9000 manuals
Add to My Manuals
Save this manual to your list of manuals |
Page 9 highlights
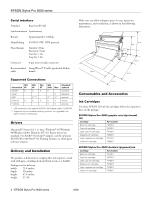
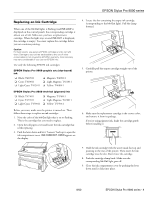
EPSON Stylus Pro 9000 series Replacing an Ink Cartridge When one of the Ink Out lights is flashing (and INK LOW is displayed on the control panel), the corresponding cartridge is almost out of ink. Make sure you have a replacement cartridge. When the light stays on and INK OUT is displayed, the cartridge is empty. You must replace the cartridge before you can continue printing. Caution: For best results, use genuine EPSON cartridges and do not refill them. Damage to your printer attributable to the use of other consumables is not covered by EPSON's warranty. Color accuracy may vary considerably if you use non-EPSON inks. Use only the following EPSON ink cartridges: EPSON Stylus Pro 9000 graphic arts (dye-based) ink ❏ Black: T407011 ❏ Cyan: T410011 ❏ Light Cyan: T412011 ❏ Magenta: T409011 ❏ Light Magenta: T411011 ❏ Yellow: T408011 EPSON Stylus Pro 9500 Archival (pigment) ink ❏ Black: T474011 ❏ Cyan: T477011 ❏ Light Cyan: T479011 ❏ Magenta: T476011 ❏ Light Magenta: T478011 ❏ Yellow: T475011 Before you start, make sure the printer is turned on. Then follow these steps to replace an ink cartridge: 1. Note the color of the Ink Out light that is on or flashing. This is the cartridge that you need to replace. 2. Open the roll paper cover and locate the ink cartridge that needs replacing. 3. Push the lever down and let it "bounce" back up to open the ink compartment cover. INK COMPART. OPEN appears on the display. 4. Locate the slot containing the empty ink cartridge (corresponding to the Ink Out light). Pull the clamp forward. 5. Carefully pull the empty cartridge straight out of the printer. 6. Make sure the replacement cartridge is the correct color, and remove it from its package. If you're using pigment ink, shake the cartridge gently before installing it. 7. Hold the ink cartridge with the arrow mark face-up and pointing to the rear of the printer. Then insert the ink cartridge into the slot. Don't force the cartridge. 8. Push the cartridge clamp back. Make sure the corresponding Ink Out light goes off. 9. Close the ink compartment cover by pushing the lever down until it clicks into place. 8/00 EPSON Stylus Pro 9000 series - 9
-
 1
1 -
2
-
3
-
 4
4 -
 5
5 -
 6
6 -
 7
7 -
 8
8 -
 9
9 -
 10
10 -
 11
11 -
 12
12 -
 13
13 -
 14
14
 |
 |
