Epson Stylus Pro 9880 UltraChrome User's Guide - Page 170
Mac OS X or Windows., Media Type, Color Density, STANDARD, NARROW
 |
View all Epson Stylus Pro 9880 UltraChrome manuals
Add to My Manuals
Save this manual to your list of manuals |
Page 170 highlights
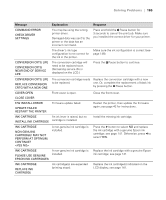
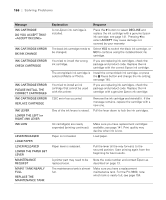
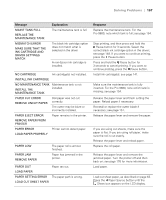
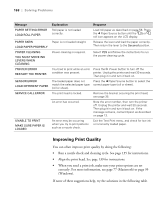
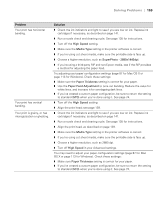
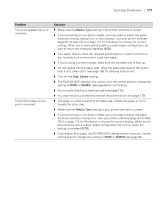
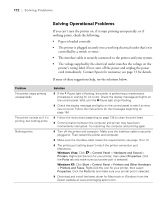
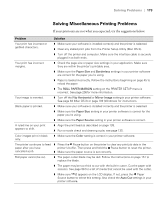
170 | Solving Problems Problem Colors are incorrect or missing. Your print has gaps or appears faint. Solution ◗ Make sure the Media Type setting in the printer software is correct. ◗ If you are using the color management features in Photoshop or another application, you must turn off color management in the printer driver. See page 86 (Mac OS X) or page 101 (Windows). ◗ Adjust the Color Density setting in the Paper Configuration utility. ◗ If you're using a third-party RIP or non-Epson media, custom color profiles will give you the best color reproduction. ◗ If you're using cut sheet media, make sure the printable side is face up. ◗ Run a nozzle check and cleaning cycle; see page 135. ◗ Check the expiration date printed on each of the ink cartridges. If the cartridge is too old, replace it as described on page 141. ◗ Check the ink indicators and light, and replace ink cartridges if your ink supply is low, as described on page 141. ◗ Make sure color settings in your application or printer software are correct. ◗ Check the expiration date printed on each of the ink cartridges. If the cartridge is too old, replace it as described on page 141. ◗ Make sure the Media Type setting in the printer software is correct. ◗ Run a nozzle check and cleaning cycle (see page 135). ◗ Check the ink indicators and light and replace ink cartridges if your ink supply is low, as described on page 141. ◗ The paper thickness setting is not correct for your paper. Use your printer software (page 87 for Mac OS X or page 113 for Windows) to choose the correct setting. When you're done printing with a custom paper configuration, be sure to return the setting to standard (STD). ◗ The PLATEN GAP setting is too wide. Use the menu system to change the setting to STANDARD, or to NARROW if printing on very thin paper. See page 68 for instructions. 170
-
 1
1 -
2
-
3
-
4
-
5
-
6
-
7
-
8
-
9
-
10
-
11
-
12
-
13
-
14
-
15
-
16
-
17
-
18
-
19
-
20
-
21
-
22
-
23
-
24
-
25
-
26
-
27
-
28
-
29
-
30
-
31
-
32
-
33
-
34
-
35
-
36
-
37
-
38
-
39
-
40
-
41
-
42
-
43
-
44
-
45
-
46
-
47
-
48
-
49
-
50
-
51
-
52
-
53
-
54
-
55
-
56
-
57
-
58
-
59
-
60
-
61
-
62
-
63
-
64
-
65
-
66
-
67
-
68
-
69
-
70
-
71
-
72
-
73
-
74
-
75
-
76
-
77
-
78
-
79
-
80
-
81
-
82
-
83
-
84
-
85
-
86
-
87
-
88
-
89
-
90
-
91
-
92
-
93
-
94
-
95
-
96
-
97
-
98
-
99
-
100
-
101
-
102
-
103
-
104
-
105
-
106
-
107
-
108
-
109
-
110
-
111
-
112
-
113
-
114
-
115
-
116
-
117
-
118
-
119
-
120
-
121
-
122
-
123
-
124
-
125
-
126
-
127
-
128
-
129
-
130
-
131
-
132
-
133
-
134
-
135
-
136
-
137
-
138
-
139
-
140
-
141
-
142
-
143
-
144
-
145
-
146
-
147
-
148
-
149
-
150
-
151
-
152
-
153
-
154
-
155
-
156
-
157
-
158
-
159
-
160
-
161
-
162
-
163
-
164
-
 165
165 -
 166
166 -
 167
167 -
 168
168 -
 169
169 -
 170
170 -
 171
171 -
 172
172 -
 173
173 -
 174
174 -
 175
175 -
176
-
177
-
178
-
179
-
180
-
181
-
182
-
183
-
184
-
185
-
186
-
187
-
188
-
189
-
190
-
191
-
192
-
193
-
194
-
195
-
196
-
197
-
198
-
199
-
200
-
201
-
202
-
203
-
204
-
205
-
206
-
207
-
208
-
209
-
210
-
211
-
212
-
213
-
214
-
215
-
216
-
217
-
218
 |
 |
