Epson Stylus Pro 9880 UltraChrome Getting Started - ColorBurst RIP installatio - Page 8
Windows Clients Printing to a Mac OS X RIP Server, Windows 7 or Windows Vista: Click
 |
View all Epson Stylus Pro 9880 UltraChrome manuals
Add to My Manuals
Save this manual to your list of manuals |
Page 8 highlights
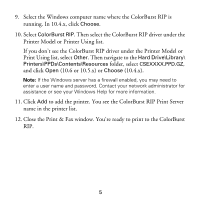
6. If you want to use the ColorBurst RIP as your default printer, choose Set as the default printer or Yes. If not, uncheck the Set as the default printer checkbox or choose No. Click Next. 7. Click Finish when you see a screen telling you that setup is complete. You're ready to print to the ColorBurst RIP. Windows Clients Printing to a Mac OS X RIP Server ColorBurst supports 32-bit versions of Windows 7, Windows Vista, and Windows XP. Other versions of Windows, including 64-bit versions, are not supported. 1. Make sure your computer is connected to the same network as the ColorBurst RIP server computer. 2. Copy the Windows Print Driver zip file from the Applications > ColorBurst > Utilities folder on the server to the client system. 3. Unzip the Windows Print Driver zip file. 4. Windows 7 or Windows Vista: Click > Control Panel > Devices and Printers (or Hardware and Sound) > Printers. Windows XP: Click Start > Control Panel > Printers and Faxes. 5. Windows 7 or Windows Vista: Click Add a Printer. Windows XP: Double-click the Add Printer icon, then click Next. 7
-
 1
1 -
2
-
 3
3 -
 4
4 -
 5
5 -
 6
6 -
 7
7 -
 8
8 -
 9
9 -
 10
10 -
 11
11 -
 12
12 -
 13
13 -
14
 |
 |
