Epson SureColor P6000 Standard Edition User Manual - Page 120
Selecting Roll Paper Settings - OS X, Finest Detail, Parent topic, Manage Custom Sizes, Paper Size
 |
View all Epson SureColor P6000 Standard Edition manuals
Add to My Manuals
Save this manual to your list of manuals |
Page 120 highlights
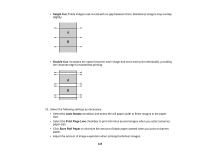
Finest Detail Sharpens edges on vector-based data including text, graphics, and line art. (This setting does not affect photographs.) Parent topic: Selecting Basic Print Settings - OS X Selecting Roll Paper Settings - OS X To print on roll paper, you select the roll paper size and roll paper options from the Printer Settings menu. 1. Select Manage Custom Sizes as the Paper Size setting. 2. Click +, double-click Untitled, and enter a name for your roll paper size. 3. Enter the width of the roll paper image as the Width setting. Note: Make sure your image fits within the width of your roll paper. 4. Enter the length of your roll paper image as the Height setting. Note: Select your product from the Non-Printable Area menu to automatically select the largest paper size for your product. 5. Set the margin setting to 0. 6. Click OK. 7. Select your new custom roll paper size as the Paper Size setting. 8. Select Roll Paper Settings. 120
-
 1
1 -
2
-
3
-
4
-
5
-
6
-
7
-
8
-
9
-
10
-
11
-
12
-
13
-
14
-
15
-
16
-
17
-
18
-
19
-
20
-
21
-
22
-
23
-
24
-
25
-
26
-
27
-
28
-
29
-
30
-
31
-
32
-
33
-
34
-
35
-
36
-
37
-
38
-
39
-
40
-
41
-
42
-
43
-
44
-
45
-
46
-
47
-
48
-
49
-
50
-
51
-
52
-
53
-
54
-
55
-
56
-
57
-
58
-
59
-
60
-
61
-
62
-
63
-
64
-
65
-
66
-
67
-
68
-
69
-
70
-
71
-
72
-
73
-
74
-
75
-
76
-
77
-
78
-
79
-
80
-
81
-
82
-
83
-
84
-
85
-
86
-
87
-
88
-
89
-
90
-
91
-
92
-
93
-
94
-
95
-
96
-
97
-
98
-
99
-
100
-
101
-
102
-
103
-
104
-
105
-
106
-
107
-
108
-
109
-
110
-
111
-
112
-
113
-
114
-
 115
115 -
 116
116 -
 117
117 -
 118
118 -
 119
119 -
 120
120 -
 121
121 -
 122
122 -
 123
123 -
 124
124 -
 125
125 -
126
-
127
-
128
-
129
-
130
-
131
-
132
-
133
-
134
-
135
-
136
-
137
-
138
-
139
-
140
-
141
-
142
-
143
-
144
-
145
-
146
-
147
-
148
-
149
-
150
-
151
-
152
-
153
-
154
-
155
-
156
-
157
-
158
-
159
-
160
-
161
-
162
-
163
-
164
-
165
-
166
-
167
-
168
-
169
-
170
-
171
-
172
-
173
-
174
-
175
-
176
-
177
-
178
-
179
-
180
-
181
-
182
-
183
-
184
-
185
-
186
-
187
-
188
-
189
-
190
-
191
-
192
-
193
-
194
-
195
-
196
-
197
-
198
-
199
-
200
-
201
-
202
-
203
-
204
-
205
-
206
-
207
-
208
-
209
-
210
-
211
-
212
-
213
-
214
-
215
-
216
-
217
-
218
-
219
-
220
-
221
-
222
-
223
-
224
-
225
-
226
 |
 |
