Epson V11H179020 Product Information Guide - Page 10
Using the Menus
 |
UPC - 010343853997
View all Epson V11H179020 manuals
Add to My Manuals
Save this manual to your list of manuals |
Page 10 highlights
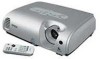
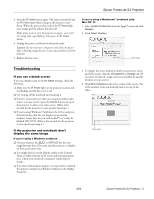
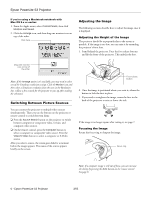
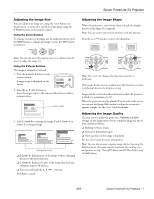
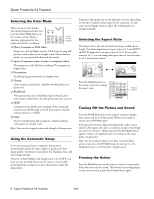
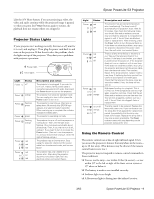
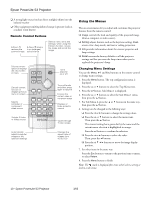
Epson PowerLite S3 Projector ❏ A strong light source (such as direct sunlight) shines into the infrared receiver ❏ Other equipment emitting infrared energy is present (such as a radiant room heater) Remote Control Buttons E-Zoom x E-Zoom z zooms reduces the in on (enlarges) zoomed image selected area Selects menu items and settings; when using the E-Zoom function, moves the scope and scrolls the image Selects a menu option or displays the next screen or menu Cancels current function or displays previous menu or screen Selects computer or component video source Selects S-Video or Video source Automatically adjusts computer images to the optimum settings Turns projector on or off Turns off audio and video; press again to resume Freezes the current video or computer image Displays or hides projector menus Cycles through 7 color modes Changes the aspect ratio of images from 4:3 to 16:9 Using the Menus The on-screen menus let you adjust and customize the projector features from the remote control: ❏ Image controls the look and quality of the projected image (from a computer or video source). ❏ Setting adjusts features such as the keystone setting, blank screen color, sleep mode, and rear or ceiling projection. ❏ Info provides information about the current projector and lamp settings. ❏ Reset restores the factory defaults to all the projector settings and lets you reset the lamp timer when you've replaced the projector's lamp. Changing Menu Settings You use the Menu, e, and Esc buttons on the remote control to change menu settings. 1. Press the Menu button. The top configuration menu is displayed. 2. Press the u or d buttons to select the Top Menu item. 3. Press the e button. Sub Menu 1 is displayed. 4. Press the u or d buttons to select the Sub Menu 1 items, then press the e button. 5. For Sub Menu 2, press the u or d buttons in the same way, then press the e button. 6. Settings can be changed in the follwing ways: ❏ Press the l or r buttons to change the setting values. ❏ Press the u or d buttons to select the menu item. Then press the e button. The current setting has a green dot by the name and the current menu selection is highlighted in orange. Press the e button to confirm the selection. ❏ Press the l or r buttons to select the value. Then, press the e button. ❏ Press the u d l r buttons to move the image display position. 7. Set other items in the same way. Press the Esc button to return to the previous item or menu, or select Return. 8. Press the Menu button to finish. Note: The mark is displayed after items which select a setting or lead to a sub menu. 10 - Epson PowerLite S3 Projector 3/05
-
 1
1 -
2
-
3
-
4
-
 5
5 -
 6
6 -
 7
7 -
 8
8 -
 9
9 -
 10
10 -
 11
11 -
 12
12 -
 13
13 -
 14
14
 |
 |
