Epson V11H179020 Product Information Guide - Page 6
Switching Between Picture Sources, Adjusting the Image
 |
UPC - 010343853997
View all Epson V11H179020 manuals
Add to My Manuals
Save this manual to your list of manuals |
Page 6 highlights
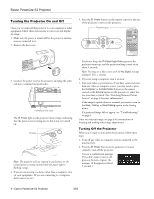
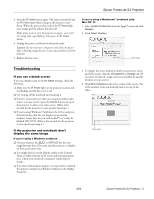
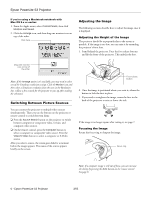
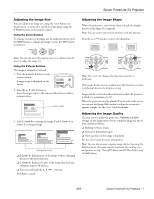
Epson PowerLite S3 Projector If you're using a Macintosh notebook with Mac OS 9.x or earlier: 1. From the Apple menu, select Control Panels, then click Monitors and Sound. 2. Click the Arrange icon, and then drag one monitor icon on top of the other. Click here Adjusting the Image The following sections describe how to adjust the image once it is displayed. Adjusting the Height of the Image The projector should be as perpendicular to the screen as possible. If the image is too low, you can raise it by extending the projector's front foot. 1. Stand behind the projector. Press the foot release buttons and lift the front of the projector. This unlocks the foot. Drag one monitor icon on top of the other Note: If the Arrange option isn't available, you may need to select one of the Simulscan resolution settings. Click the Monitor icon and then select a Simulscan resolution from the ones in the Resolution box. (Allow a few seconds for the projector to sync up after making the selection.) Switching Between Picture Sources You can connect the projector to multiple video sources simultaneously. Then you use the buttons on the projector or remote control to switch between them: ❏ Press the Source Search button on the projector to switch between computer or component video, S-video, and composite video sources. ❏ On the remote control, press the Computer button to select a computer or component video source. Press the Video/S-Video button to select a composite or S-Video source. After you select a source, the screen goes dark for a moment before the image appears. The name of the source appears briefly on the screen. Foot release button 2. Once the image is positioned where you want it, release the button to lock the foot in place. 3. If you need to straighten the image, rotate the foot in the back of the projector to raise or lower the side. If the image is no longer square after raising it, see page 7. Focusing the Image Rotate the focus ring to sharpen the image. Focus ring Note: If a computer image is still out of focus, you can increase the clarity by pressing the Auto button on the remote control. See page 8. 6 - Epson PowerLite S3 Projector 3/05
-
 1
1 -
 2
2 -
 3
3 -
 4
4 -
 5
5 -
 6
6 -
 7
7 -
 8
8 -
 9
9 -
 10
10 -
 11
11 -
 12
12 -
13
-
14
 |
 |
