Epson WF-4720 Users Guide - Page 137
Starting a Scan Using the Epson Scan 2 Icon, Epson Software
 |
View all Epson WF-4720 manuals
Add to My Manuals
Save this manual to your list of manuals |
Page 137 highlights
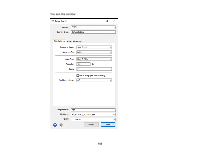
4. Open the Edit Job Settings drop-down list and select the scan button settings you want to view or change. 5. Change the settings as necessary. 6. Click OK. 7. Click Close to close the Event Manager window. Parent topic: Starting a Scan Starting a Scan Using the Epson Scan 2 Icon You can start the Epson Scan 2 program to select scan settings, scan, and save the scanned image to a file. • Windows 10: Click and select All apps > EPSON > Epson Scan 2. • Windows 8.x: Navigate to the Apps screen and select Epson Scan 2. • Windows (other versions): Click or Start, and select All Programs or Programs. Select EPSON > Epson Scan 2 > Epson Scan 2. • Mac: Open the Applications folder, open the Epson Software folder, and select Epson Scan 2. 137
-
 1
1 -
2
-
3
-
4
-
5
-
6
-
7
-
8
-
9
-
10
-
11
-
12
-
13
-
14
-
15
-
16
-
17
-
18
-
19
-
20
-
21
-
22
-
23
-
24
-
25
-
26
-
27
-
28
-
29
-
30
-
31
-
32
-
33
-
34
-
35
-
36
-
37
-
38
-
39
-
40
-
41
-
42
-
43
-
44
-
45
-
46
-
47
-
48
-
49
-
50
-
51
-
52
-
53
-
54
-
55
-
56
-
57
-
58
-
59
-
60
-
61
-
62
-
63
-
64
-
65
-
66
-
67
-
68
-
69
-
70
-
71
-
72
-
73
-
74
-
75
-
76
-
77
-
78
-
79
-
80
-
81
-
82
-
83
-
84
-
85
-
86
-
87
-
88
-
89
-
90
-
91
-
92
-
93
-
94
-
95
-
96
-
97
-
98
-
99
-
100
-
101
-
102
-
103
-
104
-
105
-
106
-
107
-
108
-
109
-
110
-
111
-
112
-
113
-
114
-
115
-
116
-
117
-
118
-
119
-
120
-
121
-
122
-
123
-
124
-
125
-
126
-
127
-
128
-
129
-
130
-
131
-
 132
132 -
 133
133 -
 134
134 -
 135
135 -
 136
136 -
 137
137 -
 138
138 -
 139
139 -
 140
140 -
 141
141 -
 142
142 -
143
-
144
-
145
-
146
-
147
-
148
-
149
-
150
-
151
-
152
-
153
-
154
-
155
-
156
-
157
-
158
-
159
-
160
-
161
-
162
-
163
-
164
-
165
-
166
-
167
-
168
-
169
-
170
-
171
-
172
-
173
-
174
-
175
-
176
-
177
-
178
-
179
-
180
-
181
-
182
-
183
-
184
-
185
-
186
-
187
-
188
-
189
-
190
-
191
-
192
-
193
-
194
-
195
-
196
-
197
-
198
-
199
-
200
-
201
-
202
-
203
-
204
-
205
-
206
-
207
-
208
-
209
-
210
-
211
-
212
-
213
-
214
-
215
-
216
-
217
-
218
-
219
-
220
-
221
-
222
-
223
-
224
-
225
-
226
-
227
-
228
-
229
-
230
-
231
-
232
-
233
-
234
-
235
-
236
-
237
-
238
-
239
-
240
-
241
-
242
-
243
-
244
-
245
-
246
-
247
-
248
-
249
-
250
-
251
-
252
-
253
-
254
-
255
-
256
-
257
-
258
-
259
-
260
-
261
-
262
-
263
-
264
-
265
-
266
-
267
-
268
-
269
-
270
-
271
-
272
-
273
-
274
-
275
-
276
-
277
-
278
-
279
-
280
-
281
-
282
-
283
-
284
-
285
-
286
-
287
-
288
-
289
-
290
-
291
-
292
-
293
-
294
-
295
-
296
-
297
-
298
-
299
-
300
-
301
-
302
-
303
-
304
-
305
-
306
-
307
-
308
-
309
-
310
-
311
-
312
-
313
-
314
-
315
-
316
-
317
 |
 |

137
4.
Open the
Edit Job Settings
drop-down list and select the scan button settings you want to view or
change.
5.
Change the settings as necessary.
6.
Click
OK
.
7.
Click
Close
to close the Event Manager window.
Parent topic:
Starting a Scan
Starting a Scan Using the Epson Scan 2 Icon
You can start the Epson Scan 2 program to select scan settings, scan, and save the scanned image to a
file.
•
Windows 10:
Click
and select
All apps
>
EPSON
>
Epson Scan 2
.
•
Windows 8.x
: Navigate to the
Apps
screen and select
Epson Scan 2
.
•
Windows (other versions)
: Click
or
Start
, and select
All Programs
or
Programs
. Select
EPSON
>
Epson Scan 2
>
Epson Scan 2
.
•
Mac:
Open the
Applications
folder, open the
Epson Software
folder, and select
Epson Scan 2
.