Epson WF-4720 Users Guide - Page 148
Creating Contacts for Scanning, Parent topic, Email, Scan to Network Folder/FTP, Contacts, Add Entry
 |
View all Epson WF-4720 manuals
Add to My Manuals
Save this manual to your list of manuals |
Page 148 highlights
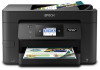
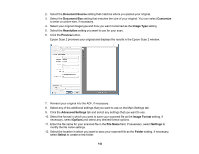
Increase the Epson Scan 2 Resolution setting in your scan. Increase the resolution by the same amount you will increase the image size to retain a high image quality. For example, if the resolution is 300 dpi (dots per inch) and you will double the image size later, change the Resolution setting to 600 dpi. • You will scan the image at 100% or smaller size. Select the Epson Scan 2 Resolution setting based on how you will use the scanned image: • Email/view on a computer screen/post on the web: 96 to 200 dpi • Print/fax/convert to editable text (OCR)/create searchable PDF: 200 to 300 dpi Parent topic: Scanning in Epson Scan 2 Creating Contacts for Scanning You can create a list of contacts for scanning to email or to a network folder or FTP. 1. Press the home button, if necessary. 2. Select Scan and do one of the following: • To create a contact for scanning to email, select Email. • To create a location for scanning to a network folder or FTP, select Scan to Network Folder/FTP. 3. Select Contacts > Add Entry. 4. Select Add Contact, if necessary. 5. Select the number you want to use for the contact you are adding. 6. Select the Name field, use the displayed keyboard to enter the contact name (up to 30 characters), and press OK. 7. Select the Index Word field, use the displayed keyboard to enter a word to use when searching for an entry (up to 30 characters), and press OK. (This field is optional.) 8. Do one of the following: • For an email contact, select the Email Address field, use the displayed keyboard to enter the address, and press OK. • For a network folder or FTP location, select the Communication Mode field and select Network Folder (SMB) or FTP. Then select the Location field, use the displayed keyboard to enter the location, and select OK. Enter other information if necessary. 148
-
 1
1 -
2
-
3
-
4
-
5
-
6
-
7
-
8
-
9
-
10
-
11
-
12
-
13
-
14
-
15
-
16
-
17
-
18
-
19
-
20
-
21
-
22
-
23
-
24
-
25
-
26
-
27
-
28
-
29
-
30
-
31
-
32
-
33
-
34
-
35
-
36
-
37
-
38
-
39
-
40
-
41
-
42
-
43
-
44
-
45
-
46
-
47
-
48
-
49
-
50
-
51
-
52
-
53
-
54
-
55
-
56
-
57
-
58
-
59
-
60
-
61
-
62
-
63
-
64
-
65
-
66
-
67
-
68
-
69
-
70
-
71
-
72
-
73
-
74
-
75
-
76
-
77
-
78
-
79
-
80
-
81
-
82
-
83
-
84
-
85
-
86
-
87
-
88
-
89
-
90
-
91
-
92
-
93
-
94
-
95
-
96
-
97
-
98
-
99
-
100
-
101
-
102
-
103
-
104
-
105
-
106
-
107
-
108
-
109
-
110
-
111
-
112
-
113
-
114
-
115
-
116
-
117
-
118
-
119
-
120
-
121
-
122
-
123
-
124
-
125
-
126
-
127
-
128
-
129
-
130
-
131
-
132
-
133
-
134
-
135
-
136
-
137
-
138
-
139
-
140
-
141
-
142
-
 143
143 -
 144
144 -
 145
145 -
 146
146 -
 147
147 -
 148
148 -
 149
149 -
 150
150 -
 151
151 -
 152
152 -
 153
153 -
154
-
155
-
156
-
157
-
158
-
159
-
160
-
161
-
162
-
163
-
164
-
165
-
166
-
167
-
168
-
169
-
170
-
171
-
172
-
173
-
174
-
175
-
176
-
177
-
178
-
179
-
180
-
181
-
182
-
183
-
184
-
185
-
186
-
187
-
188
-
189
-
190
-
191
-
192
-
193
-
194
-
195
-
196
-
197
-
198
-
199
-
200
-
201
-
202
-
203
-
204
-
205
-
206
-
207
-
208
-
209
-
210
-
211
-
212
-
213
-
214
-
215
-
216
-
217
-
218
-
219
-
220
-
221
-
222
-
223
-
224
-
225
-
226
-
227
-
228
-
229
-
230
-
231
-
232
-
233
-
234
-
235
-
236
-
237
-
238
-
239
-
240
-
241
-
242
-
243
-
244
-
245
-
246
-
247
-
248
-
249
-
250
-
251
-
252
-
253
-
254
-
255
-
256
-
257
-
258
-
259
-
260
-
261
-
262
-
263
-
264
-
265
-
266
-
267
-
268
-
269
-
270
-
271
-
272
-
273
-
274
-
275
-
276
-
277
-
278
-
279
-
280
-
281
-
282
-
283
-
284
-
285
-
286
-
287
-
288
-
289
-
290
-
291
-
292
-
293
-
294
-
295
-
296
-
297
-
298
-
299
-
300
-
301
-
302
-
303
-
304
-
305
-
306
-
307
-
308
-
309
-
310
-
311
-
312
-
313
-
314
-
315
-
316
-
317
 |
 |